Are you getting ready to jump into some much-needed summer art-making time? Are you interested in flipping some of your lessons but aren’t sure how to make time to do so?
Why not do double duty and document the various stages of your own art-making processes? Even documenting just one summer project can give you valuable instructional resources to guide future student work.
Here are 2 great ideas to get you started.
1. Document Your Sketching and Brainstorming Process
As artists, we often like to sketch out ideas to help visualize and experiment. Sketches can be loosely constructed and experimental or highly-detailed and in color. Documenting your own sketching process can expose students to the different strategies, mistakes, and directions of your own artistic process.

Through a slideshow of photos or a short video, students will be able to compare the differences between your sketches and the final piece. Seeing the early development process can give students more confidence to experiment and take risks while encouraging them to take their drafting seriously.
The beauty of documenting these processes is that they don’t have to relate directly to what you’re doing in the classroom. A general slideshow or video about sketching or brainstorming could work for almost any project in your art room.
2. Document Your Process Start to Finish
How do you introduce artistic techniques to students? Do you replicate multiple demonstrations each class period, having to work extra hard when absent students come back the following day? One method I love to use is to make an instructional slideshow.
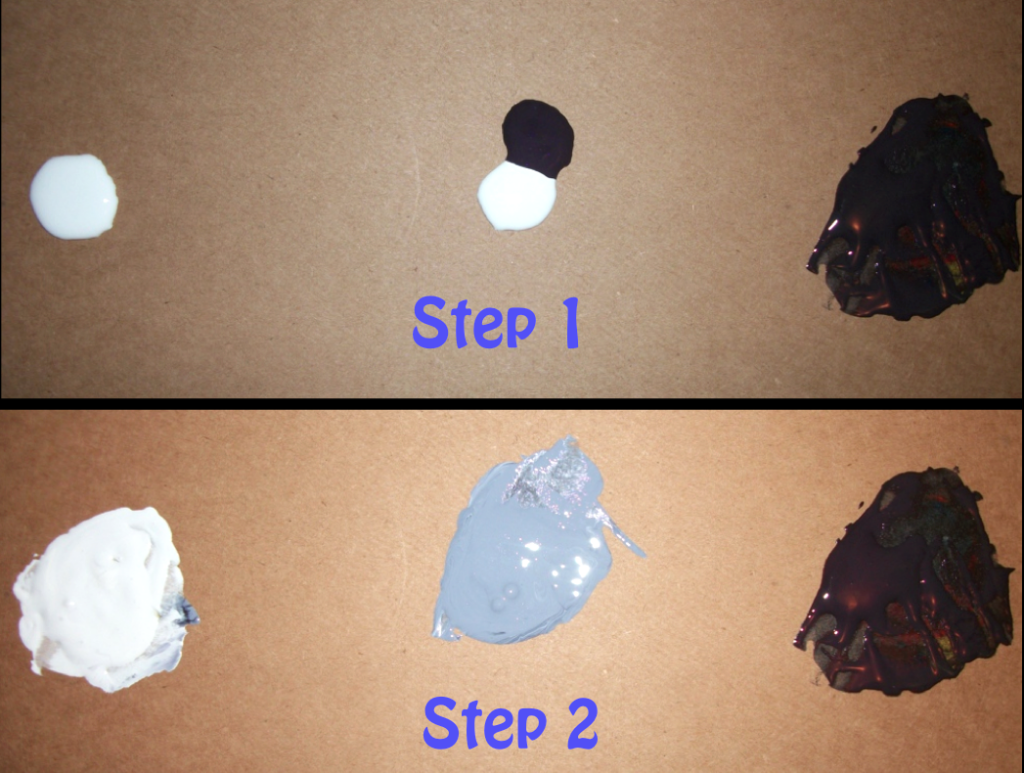
First, photograph the different stages of your art-making process. Then create a slideshow in your favorite presentation format (Keynote, PowerPoint, Prezi, etc.). Put this on a computer device with a projector and you have a step-by-step visual coach.
After introducing a slideshow with the whole class, individuals can further access this resource as needed and absent students can catch up the following day. This approach allows for more time to reach students with the most needs.
Instead of a slideshow, you might also consider making a short video like the one I made below about blending colors using the wet into wet technique.
Again, the beauty here is that if you are doing an acrylic painting for yourself this summer, you can use the instructional slideshow you create to introduce almost any painting project in your art room. Plus, your students will get to see you, their teacher, at work on a real-life project. Not only is the presentation informational, it’s also inspirational.
If you’re looking for even more ways to make your own art and teaching tools at the same time, be sure to join me for the Summer 2016 Art Ed Now Conference. My presentation is titled The Ultimate Multitasking: Creating Your Own Art and Instructional Resources Simultaneously. Find out even more ways to document your own art-making processes and hear why I think teacher examples are a great teaching tool. Hope to see you there!
What questions do you have about making instructional resources using your own art practice?
What are some of your instructional resources that are the most successful with students?
Magazine articles and podcasts are opinions of professional education contributors and do not necessarily represent the position of the Art of Education University (AOEU) or its academic offerings. Contributors use terms in the way they are most often talked about in the scope of their educational experiences.