Printmaking is one of the most engaging art processes for students, but it can quickly turn your classroom into a disaster zone. Inky rollers, murky water, and sticky plates can make cleanup overwhelming. Plus, it can require alternative materials that may be new to your classroom. With smart and efficient strategies, you can keep your printmaking tools in top shape while teaching students responsibility.
Gain time-saving hacks, space-saving solutions, and teacher-tested tricks to make printmaking in the classroom easier than ever!

Smart Flow Stations
Instead of having materials scattered across the room, try stations. This helps students move through the printmaking process with more independence. Give a clearly defined purpose and provide anchor charts to remind students about the purpose, steps, and materials for each station. Try breaking your stations down into the following: Inking, Printing, Drying, and Cleaning.
Here are common materials to include at each station:
- Inking: Inks, brayers, palettes, wipes, and paper towels.
- Printing: Printing press, barens, or large spoons, newsprint, printing paper, and scrap paper.
- Drying: Tables, drying racks, or clothesline and pins.
- Cleaning: Sponges, buckets, soap, wipes, paper towels, and drying cloths.
Space-Saving Storage Hacks
No matter how large or small your teaching space is, printmaking storage requires extra care. Supplies like brayers, printing plates, and rags can pile up fast. To avoid clutter, think in terms of visibility, accessibility, and vertical space.
Explore these three creative storage ideas:
- Brayers
Brayers are often bulky to store in containers. Glue magnets to the handle and attach them to magnetic strips, or if there are holes in the handle, use small nails or adhesive hooks to utilize wall space. - Printing Plates
Store a class’s printing plates in a large accordion folder or collect each table’s printing plates in labeled pizza boxes. Ask your local pizzeria for box donations! Plus, they are easy to stack and will keep the plates clean and organized. - Rags
Dry wet rags and cloths on a retractable clothesline. Once dry, store in an over-the-door shoe or pocket organizer.
Budget Drying Racks
Drying prints is one of the biggest space challenges in a classroom because students are often rapidly printing multiples. If you don’t have access to a traditional drying rack, you’ll need to get creative. Immediately hang wet prints up using a clothesline and clothespins. Ask local grocery stores or bakeries for donations of rolling baking racks to store prints on. Tape newspapers under tables or desks and gently place prints under the table. If you have absolutely no space, send prints home the same day. Protect damp ink with “print sandwiches” using newspaper and cardboard.

Team Effort Cleanup
Are you the last one in the room scrubbing brayers and wiping tables? Cleaning up after a printmaking lesson takes time, but it doesn’t have to all fall on you. Creating a job system gives students ownership and accountability over materials and teaches them to respect the tools they use. Make students feel “official” with fun laminated name tags that have their cleanup role on them!
Try these fun cleanup roles:
- Brayer Boss: Cleans and returns brayers.
- Plate Patrol: Wipes down and stacks plates, palettes, and trays.
- Ink Inspector: Checks for inky fingers before anyone leaves and distributes wipes accordingly.
- Table Technician: Ensures all tables are clean and dry.
- Paper Picker: Picks up and recycles all paper scraps.
- Print Pro: Organizes drying racks or hanging prints.
No Sink Printmaking
It’s easy to stick with drawing if you don’t have sink access. However, with some water-saving tricks and a bit of planning, you can still bring the magic of printmaking to your students! The goal is to remove most of the ink before rinsing and to conserve water. Grab a bunch of cheap spray bottles and pre-fill them with clean and soapy water, and you’re ready to go!

Follow these easy steps to make cleanup without a sink a breeze:
- Cover tables with newsprint or disposable tablecloths and toss them at the end of the period.
- Roll off excess ink from the brayers onto scrap paper.
- Spray soapy water on the brayers and roll onto a damp sponge or rag.
- Wipe the brayers down with a dry cloth and store.
- Use paper plates for palettes and throw them away at the end of the period.
- Provide wet wipes or DIY ones to clean hands.
- Keep shop towels on hand for emergency cleanup!
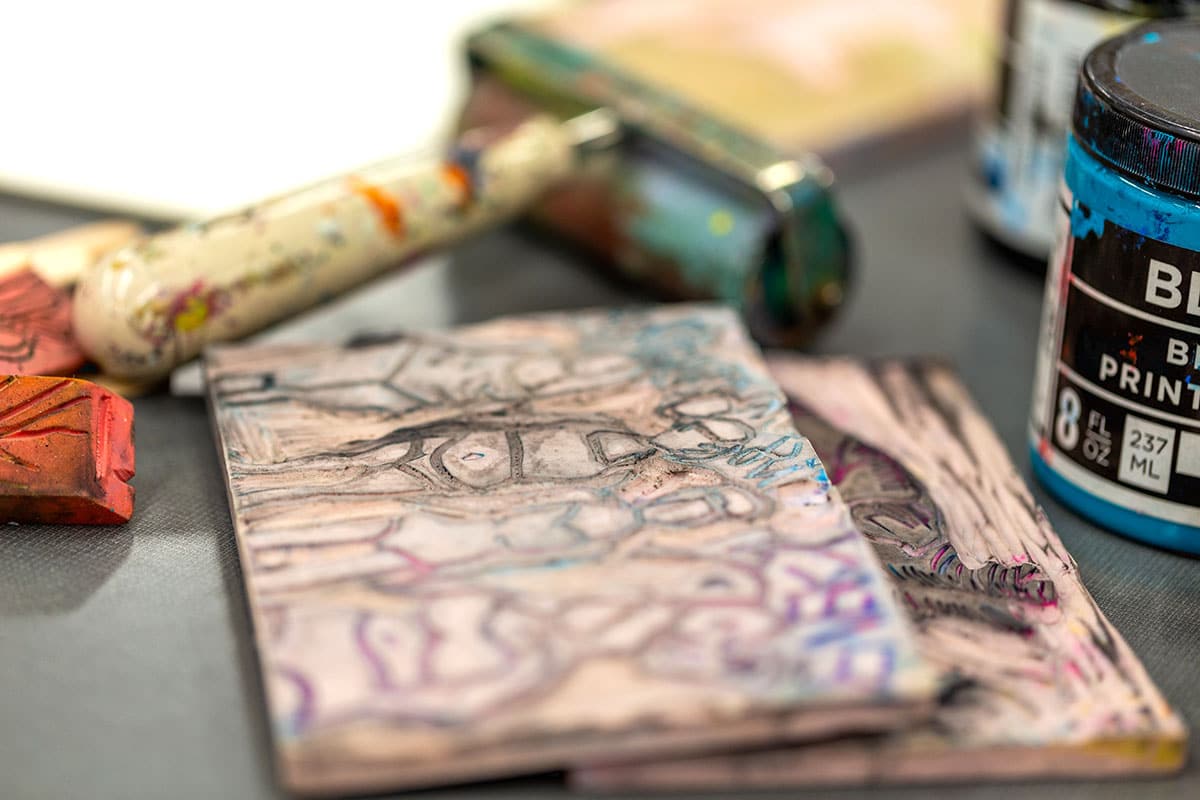
Leftover Ink Ideas
Leftover ink doesn’t have to go straight into the trash. In fact, it can lead to some of the most creative moments in your printmaking unit. About 5-10 minutes before it’s time to clean up, walk around and see if you notice leftover ink. Turn this opportunity into a mini challenge to foster sustainability! Prompt students to create a print using only what’s left on the brayer and plate.
Here are four ways to use leftover ink:
- Pull ghost prints from the same plate.
- Save roll-off sheets for future collage or layering.
- Play with color mixing and gradations.
- Experiment with textured scraps of paper.

Printmaking is truly all about the creative process, so why not invite students to extend the experience into cleanup? When you provide students with structure and empower them with responsibility, cleanup will transform from a chore into part of the learning. The key to success is preparing your hacks ahead of time and ensuring all systems are in place with clear expectations before students crack the printing ink open. These small routines build lasting habits and teach students that caring for their creative space is just as important as creating within it.
What printmaking hack would you add to the list above?
How do you incorporate cleaning into part of your students’ artistic process?
To chat about printmaking with other art teachers, join us in The Art of Ed Community!
Magazine articles and podcasts are opinions of professional education contributors and do not necessarily represent the position of the Art of Education University (AOEU) or its academic offerings. Contributors use terms in the way they are most often talked about in the scope of their educational experiences.