For many art teachers, assessment is a four-letter word. Assessments eat class time and don’t always provide quality information. Most assessments check for learning after all the teaching is done. But knowing what your students know before you create a lesson can save you time in the long run! That’s where pre-assessment comes in.
Pre-assessments are a great way to tailor your instruction for your students. Plus, coupled with summative assessment methods, they are an effective way to show student growth.
A good pre-assessment:
- Is quick
- Is focused
- Checks for understanding before you teach
- Is NOT for a grade (but can be used to collect data)
Here are 5 simple pre-assessment strategies to use in your art room.

1. “Now I Know/I Already Knew That”
This pre-assessment is perfect for showing growth for Student Learning Objectives (SLOs). It’s straightforward and easy to tally. Here’s how it works.
1. Choose a question with one correct answer that can inform your next lesson.
Some examples of things you can assess using “Now I know” are:
- Vocabulary Questions
– What does the word _______________ mean? - Setup or Cleanup Expectations
– What direction to paint brushes face when drying in a cup?
– Shaking clay dust into the air is dangerous. True or False?
– Name one thing you should never do when cleaning up your clay area. - Steps of a Process
– In 3 steps, explain how you mix the color green using paint.
– In less than 5 steps, tell me how to make a collage.
– On the outline of the head below, show how you measure the proportions of facial features. - Art History Questions
– What type of art did __________ create?
– Name three surrealist artists.
2. Have students answer the question.
There are a few ways to do this. One idea is to create slips of paper with the question and pass them out to the students to use. Or, you could write the question on the board and have the students answer on blank scrap paper.
3. Collect the responses.
After students have responded to the question, you’ll need an area to collect their answers. First, create two boxes. One box will say “I Knew That Already.” The other will say “Now I Know.” Between the boxes, have a folder that contains the answer to your question with the label “Top Secret.”
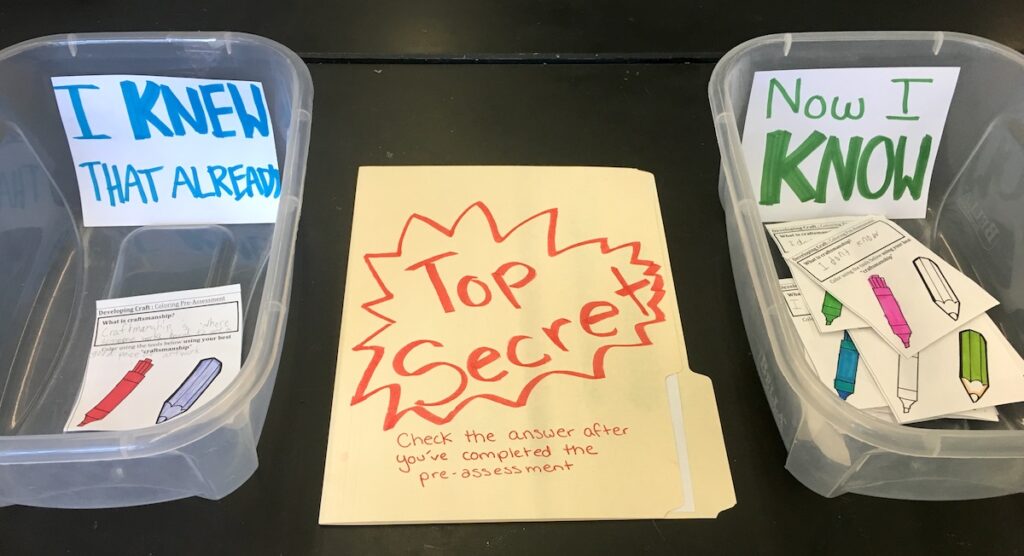
As they finish, students can come up and check their answers against the answer in the “Top Secret” folder. If they get the answer right, they will put their slip of paper into the “I Knew that Already” box. If they got the answer wrong, they’ll put their slip of paper into the “Now I Know” box.
Make sure you reiterate that this activity is not graded! You’ll also want to remind students they should not share the answer in the “Top Secret” folder with their classmates.
4. Tally the Responses
After the class leaves, you can quickly see which students have prior knowledge about your question and which do not by dumping out both boxes.
5. Use the results to inform your instruction and to show growth.
After this activity, you will have a good idea of how many students have prior knowledge of the concept you’re assessing. You can now tailor your instruction to emphasize concepts fewer students understand.
After instruction, you can pose the same question to get a summative data point to show student growth!
2. Thumbs Up, Thumbs Down
This is the quickest way to pre-assess a class. At the end of a class period, have students gather around for a series of quick pre-assessment questions. Give them true or false questions they can answer with their thumbs and not their voices. You can also give out paper plates or note cards with yes and no on either side.
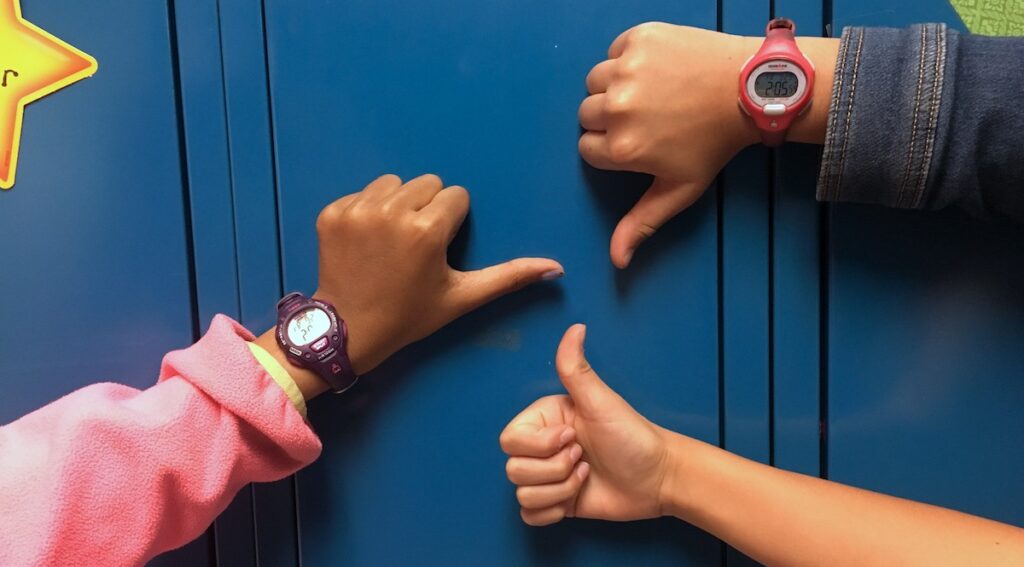
Choose three to five things you think students may know or may not know about next week’s topic. Create a grid where you can keep a tally of class responses.
Encourage students to be honest! It’s not for a grade, and you don’t get points for knowing the answer. Although it’s not a perfect method, it does have two benefits. It prepares students for what’s happening during the next class and also collects easy pre-assessment data points for you to record!
If you’re looking for even more assessment ideas, be sure to check out the Effective Formative Strategies PRO Pack. You’ll walk away with the know-how to create a solid formative assessment plan for your students! You can find this pack and more like it in PRO Learning.
3. Skills Conference
A skills conference is a bit more time-consuming than most pre-assessments but gives the most accurate data. During student work time, have students assess a skill with you one-on-one. Make sure you choose something that is quick to assess so you can get through all students in one class period. Here’s what to do.
- Decide on one important skill students will need for your next lesson.
This may include cutting, gluing, using a tool or materials, clay skills (coils, slipping and scoring), color mixing, etc. Boil it down to one essential skill. - Decide how you will quickly pose a question related to that skill to students.
You might say something like, “Point to the two paint colors that make green.” or “ Try your best to roll a coil out of clay.” Let students know beforehand they might not know the correct answer and that’s okay! It’s not for a grade. It’s to see what they know and what they need. - Set up your space with a timer, a roster checklist, and the materials you need for the assessment. Make sure you have an easy method to record your data. Also, make sure you provide students not being assessed with a method to ask you for help without interrupting the assessment.
- Use your data to create small group instruction or peer coaching teams.
Use what you find during the pre-assessment to tailor your instruction during the lesson or unit. - At the end of instruction, run the skills conference again to obtain summative assessment data.
Alternately, you can also run a peer skills assessment where students assess each other, or use students’ finished artwork as a final benchmark,
4. Wonder Box
As an exit or entrance ticket, ask students to pose an “I wonder…” question about next week’s topic and place it in a “Wonder Box.” This can inform your instruction and how you teach your next lesson. You can even post the most common queries as part of your Essential Questions!
Before posing the Wonder Box question, here are some ways to get students thinking:
- Project an example of a famous artwork.
- Play a quick video of an artist working.
- Show student examples from previous years.
5. Dry-Erase Boards

When it comes to pre-assessment, dry-erase boards are the ultimate art room accessory. They allow students to show understanding through imagery and not just words. They’re also reusable! If you don’t have money to buy a class set, try laminating white card stock. They won’t be quite as heavy duty, but they’ll do the trick!
You can pose many different kinds of questions using dry-erase boards.
Here are five prompts that may work well:
- Ask students to draw as many types of line as they can.
- Ask students to draw a cube in one-point perspective.
- Ask students to come up with three different symbols for a concept.
- Ask students to write down all the vocab words they know related to a topic.
- Ask students to come up with three thumbnails for a still life.
You can use a timer to give your students a specific amount of time to respond. Once time is up, have students hold up their boards so you can tally how many students were able to complete your prompt. Here again, you can pose the same question or prompt after instruction to gather data. You may want to keep a camera handy to record your students’ responses both times before they erase their answers.
Collecting pre-assessment data for SLOs may seem like it takes unnecessary class time. Fortunately, you can create data to meet SLOs and inform your lesson in less time than you think. As your students become used to quick pre-assessments, it will take even less time!
Do you use pre-assessments in your class to inform your lessons or collect data?
What’s your preferred pre-assessment method?
Magazine articles and podcasts are opinions of professional education contributors and do not necessarily represent the position of the Art of Education University (AOEU) or its academic offerings. Contributors use terms in the way they are most often talked about in the scope of their educational experiences.