The end of the school year brings chaos. Students and teachers are looking forward to summer. Class schedules change for the end of year activities. You might have a couple of classes left with your students, but you know embarking on a new project is a mistake because there won’t be time to finish. So, what are you to do?
The end of the school year will be chaotic, but we still want our students engaged and learning. One-day lessons that focus on process are the perfect solution.
Here are 6 one-day activities you can try out.
1. Scratch Art
Students love creating scratch art. Whether the scratch art paper reveals a white, rainbow, or metallic background, they’re fascinated with the process. Scratch art paper is a beautiful way to explore mark making and drawing techniques like hatching and cross-hatching.
One specific activity to try is to challenge your students to create a camouflaged drawing using scratch art paper. To prep for this activity, create drawing prompts on small scraps of paper and put them into a container. These could be single words like “Godzilla,” or, “pizza,” or they could be phrases like, “cat wearing sunglasses,” or, “skydiving donut.” Have each student blindly choose a prompt from the container.
First, students draw their prompt onto their scratch art paper. Then, they add more and more details to their drawing until it’s difficult to discern how the piece started.
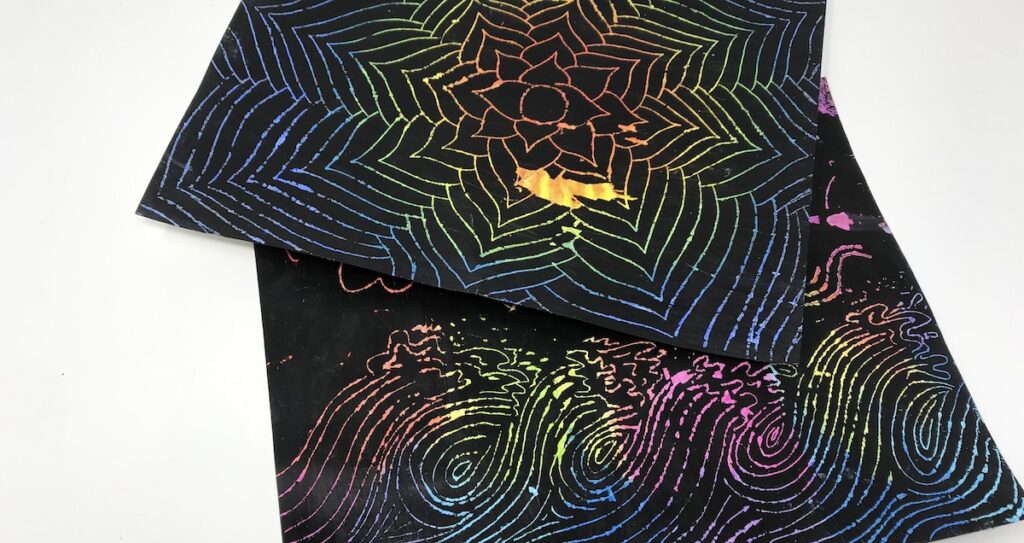
At the end of class, students can go around the room and try and guess what the original drawing prompts were. It becomes like a Where’s Waldo activity. If students struggle to identify the original drawing prompts, the activity is successful!
Scratch art paper can be pricey, so you might want to consider creating your own, taking this project from a one to two-day activity. To do this, have students start by laying down a thick, blended layer of oil pastels onto a piece of drawing paper. Once students are sure no white spaces are showing, they can paint over their design with a thin layer of black acrylic paint. The next day, when the paint is dry, students can use a wooden stylus to create their design.
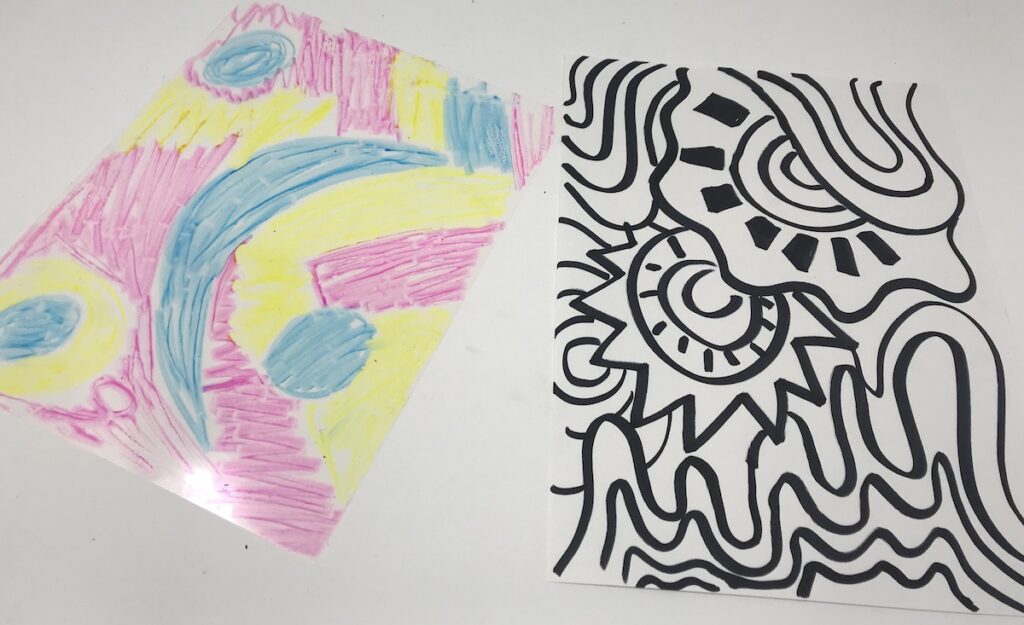
2. Marker Prints
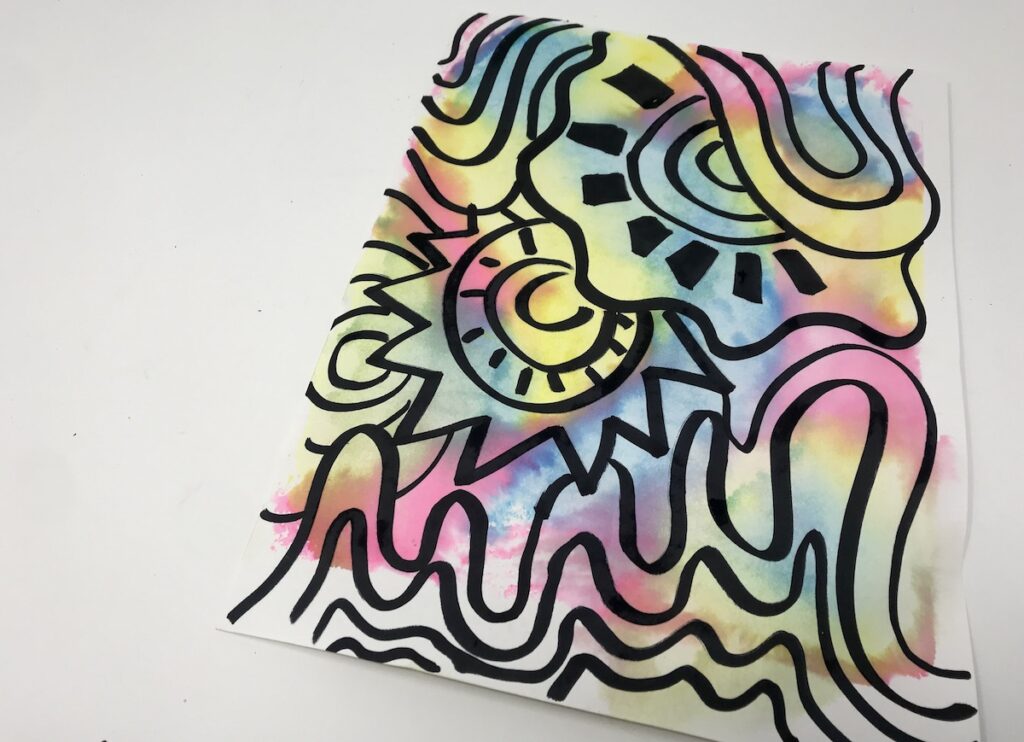
Using washable markers might seem like an elementary activity, but when they transform into something else, your older students will be amazed. To create a marker print you’ll need a plastic surface; transparencies are an excellent option.
First, use washable markers to create a design on the transparency. This is a nice time to review color mixing. If students want to avoid getting brown in the next step, they’ll need to know which colors to choose.
Once the transparency is coated with marker, spritz it with water. The markers will instantly transform into watercolors and start mixing. Place a piece of paper onto the wet transparency to create a print.
To take it up a notch, have your students create a drawing with permanent marker on their printing paper first. Here, the permanent marker design will remain intact as the printed image gets layered on top.
3. Glue, Salt, and Watercolors
This process is simple, yet students always love it. Start by creating a design with glue. Students might focus on creating lines and shapes, or could even explore writing their names or words.
While the glue is wet, sprinkle salt over the design just like you would if you were sprinkling glitter. Dump off the excess salt, and now you’re ready for liquid or pan watercolors.
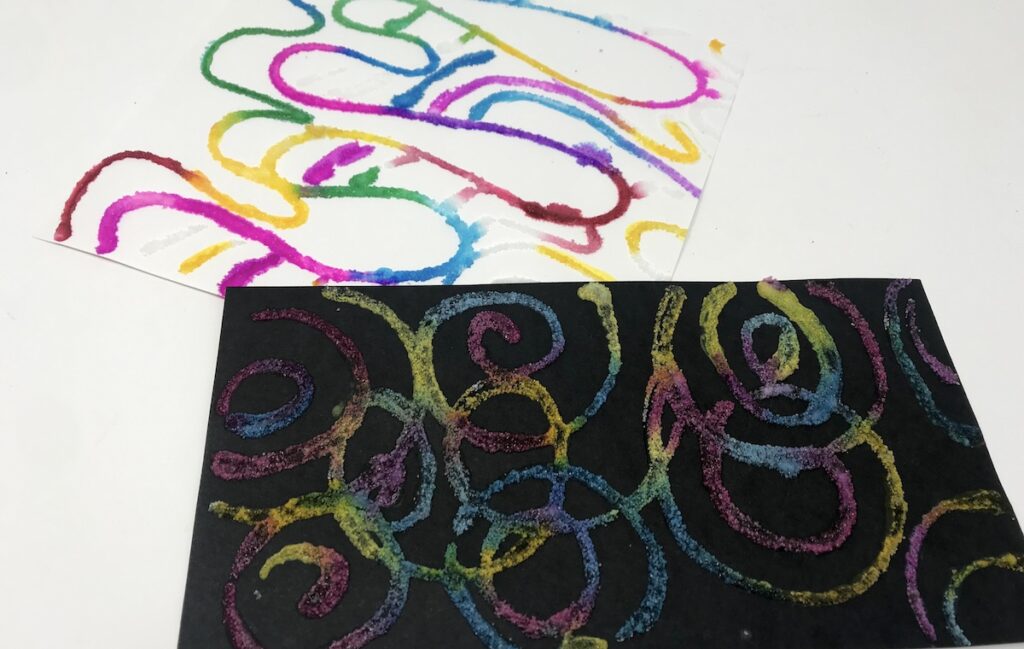
Depending on timing, you can let the glue dry overnight or add color the same day. If you’re doing the latter, remind students to touch the paintbrush to their wet glue very gently, so they don’t disrupt their designs.
When the watercolor touches the glue and salt, the color will be absorbed by the salt and start bleeding down the design. This process is an excellent way to discuss science concepts, like absorption, and art ideas, like color mixing.
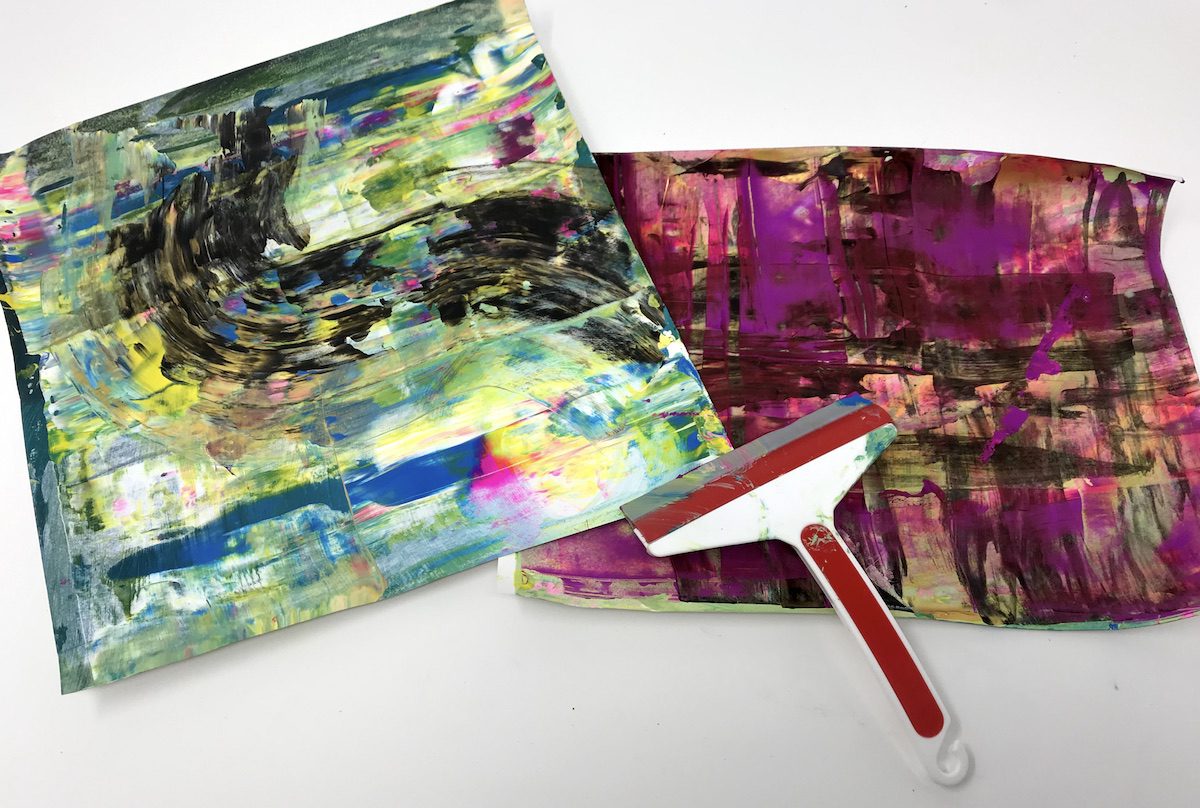
4. Squeegee Painting
Are you familiar with the squeegee painting technique by Gerhard Richter? Richter uses a series of squeegees to reveal layers of color, blend paint, and explore movement and mark-making in his work.

You can explore this same technique with your students in a variety of ways. Unclaimed artwork is a perfect starting point for these paintings. Begin by placing paint directly on the paper. Then, experiment with squeegeeing paint across the surface. Build up layers to explore further. The results will be unique and can even serve as backgrounds for future projects.
5. Sun Prints
Cyanotypes, or sun prints, are like cameraless photographs. The process dates back to the 1800s and involves a solution of ferric ammonium citrate and potassium ferricyanide. It might sound scary, but don’t fear! You can purchase ready-made paper for this process.
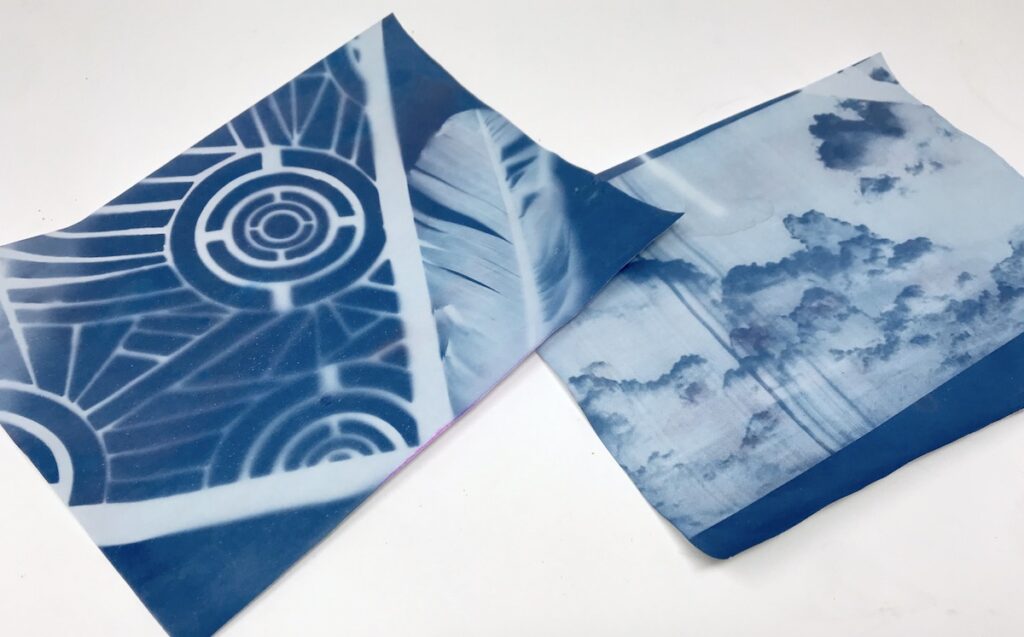
The reason this works is that cyanotype paper is sensitive to UV light. When you block some of that light and expose the rest to sunlight, you can create a print. You can place physical objects on top of the paper before taking it outside. Or, you can draw or print an image on a transparency and use that as your “stencil.” Either way, be sure to prepare your cyanotype away from direct or indirect sunlight. You can find the detailed steps to the process here. This activity is perfect for those days when it’s just too beautiful to stay indoors.
6. Marbleized Chalk Prints
Does your bin of chalk pastels always seem to be overflowing? Try creating marbleized chalk prints with your students. This is another project where you can make a science connection.
Chalk is a mineral made from calcium carbonate (CaCO3) which has low solubility. This means it doesn’t dissolve quickly in water. For this reason, you can place chalk particles on top of the water to create a design and then pull a print!
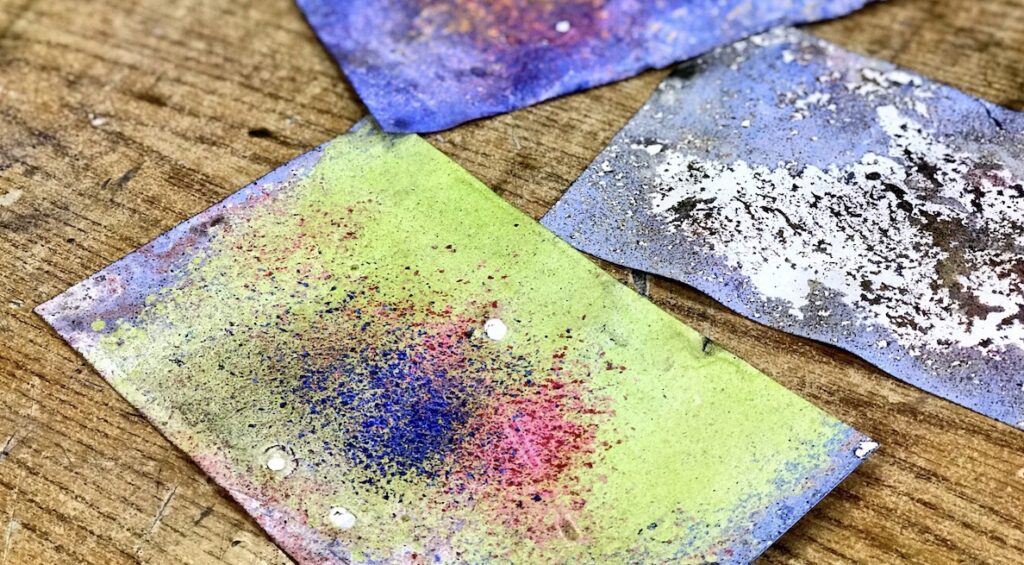
Although this process might seem complicated, it only requires water, paper, and chalk. Check out the step-by-step instructions here. Not only does the process yield beautiful results, but the finished pieces can also be used in a variety of ways. They can be stand-alone pieces, serve as a background for future drawings, or be used for collage materials.
With summer looming, and our energy as teachers winding down, implementing a one-day activity can help you finish the year strong. For some students, this may be the last time they create until they see you in the fall. Our students deserve to create and experience artmaking up until the last day of school. Try out one of these ideas to explore a unique process to engage your kids in artmaking one more time!
How do you keep your students engaged at the end of the school year?
What are your favorite one-day art activities?
Magazine articles and podcasts are opinions of professional education contributors and do not necessarily represent the position of the Art of Education University (AOEU) or its academic offerings. Contributors use terms in the way they are most often talked about in the scope of their educational experiences.