We all know that art teachers are creative. Despite that, we can all appreciate discovering new ways to make teaching art easier and more efficient. Your time is valuable, and no matter what grade level you teach or where you are in the school year, some hacks—both old and new—can be major time savers. Whether it’s coming up with solutions for storage, material management, media center visuals, or what to do with all of the freebies donated to your art room, AOEU has you covered with another round of art teacher hacks!

For even more innovative ideas to make your teaching life easier, check out our newest YouTube mini-series, Art Room Hacks. We have three art teachers who share their favorite tried-and-true hacks for elementary, middle, and high school art.
To ensure you don’t miss an episode, make sure you are subscribed to our channel and have your notifications turned on.
Storage Solutions
Art teachers have a lot of stuff. Some may have loads of storage, while others may have little to nothing at all. Here are some ways to keep your materials organized and avoid storage insanity.
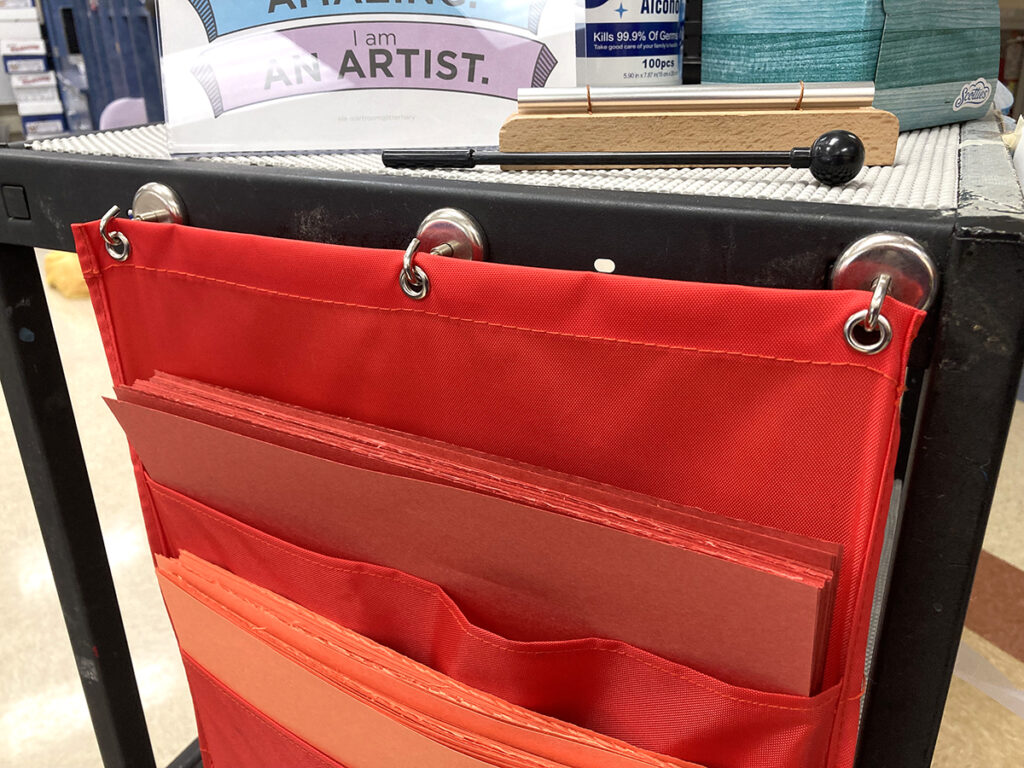
1. Teaching on a cart again this year? Try organizing your colored construction paper in a hanging pocket chart. Add some heavy magnetic hooks, and all of your paper can travel to any classroom without taking up precious realty space on your cart.
2. Construct a drying or storage rack with stackable plastic bread trays for wet paintings or organizing and storing projects. Instead of buying them, ask a local grocery store or bread manufacturer if they can donate some used ones to your art room. A can of spray paint will go a long way to make them look like they belong in your art room.
3. Are you looking for a way to store 3D works in progress? An inexpensive solution can be a lightweight shoe rack. Options come in varied sizes to accommodate your needs, such as a slender one for space-saving or something lower and wider to fit under the counter.
Are you looking for more storage options? Check out these resources:
- 10 Storage Hacks for the Art Room
- Art Teacher Hacks and Art Ed NOW Ideas (Ep. 203)
- 8 Art Room Hacks to Make Your Teaching Life Easier (Ep. 42)
Material Management
We are experts at managing materials but are totally open to suggestions when they can streamline prep, distribution, or clean up. Take a look at some ideas below to help you with your art supplies.
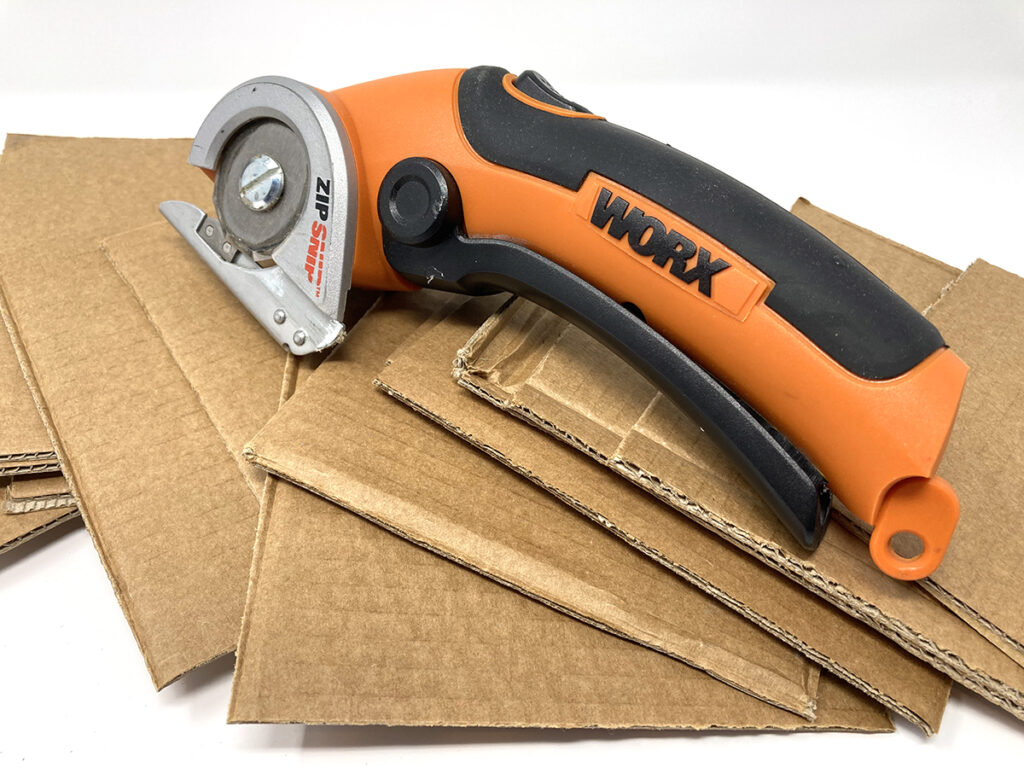
4. Cutting cardboard can be easier with electric scissors. Once you start dismantling cardboard boxes for construction projects, this tool will make you ask, “Where have you been all my life?” If you are not into the price tag, try a student-friendly, manual box cutter, like this one, along with mesh safety gloves for additional protection.
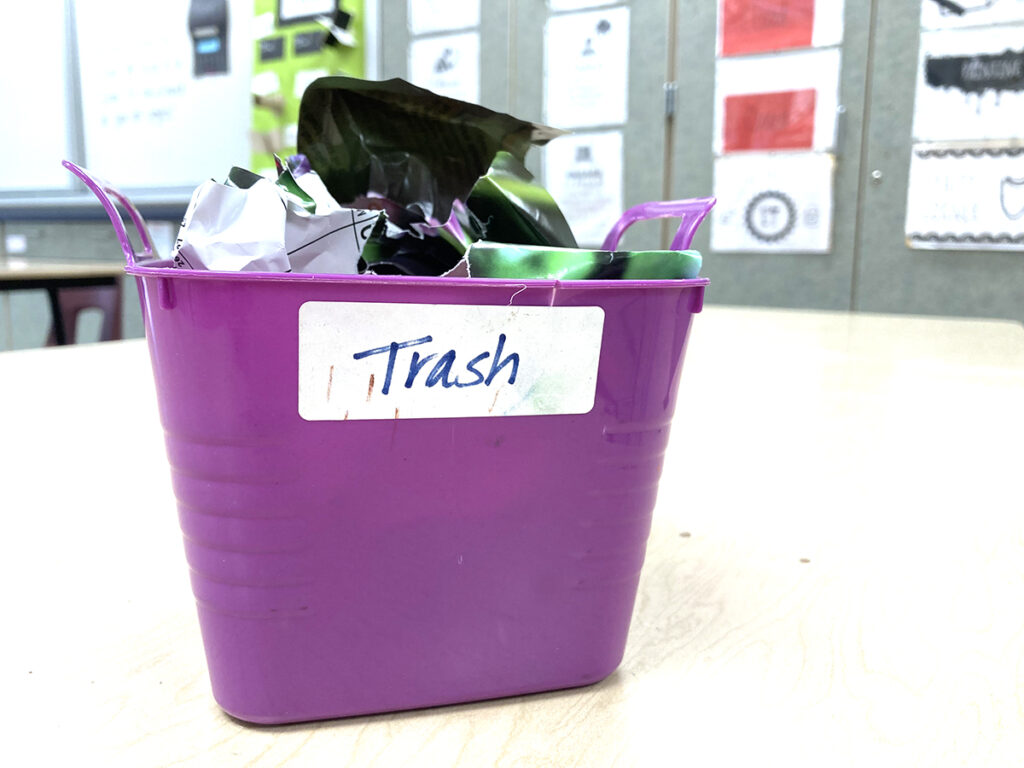
5. Does the pandemic continue to limit movement in your art room? Hang trash bags at the end of each table with a hook, or place mini trash bins around the classroom. Check your local dollar store for even better bargains!
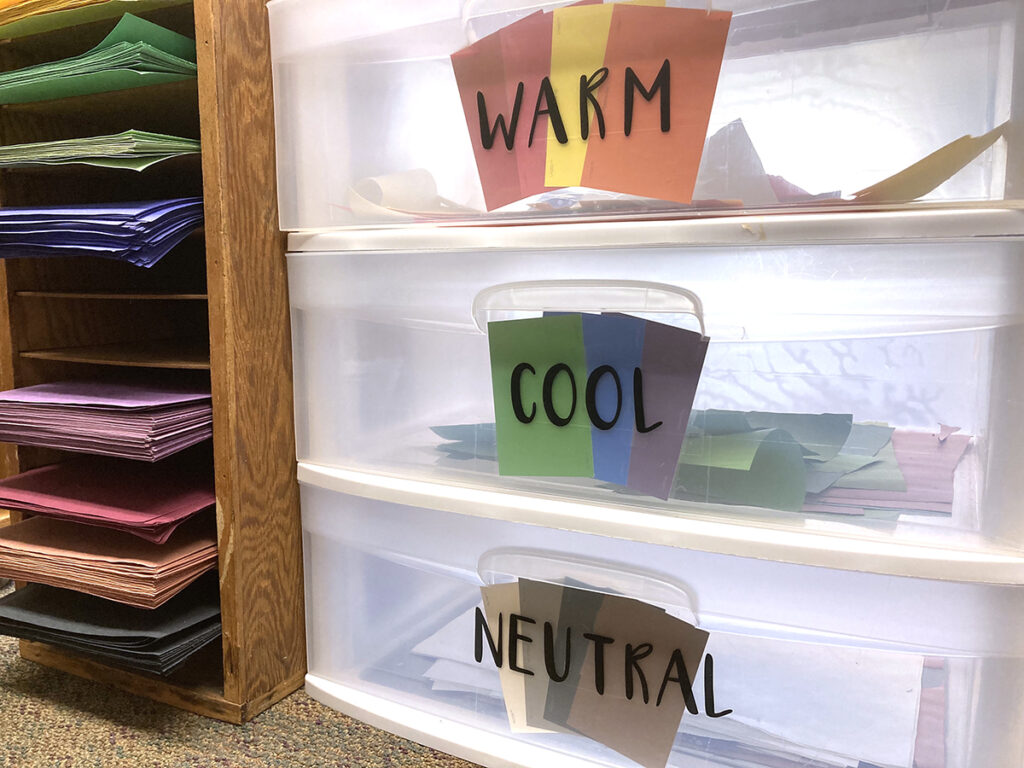
6. Keep construction paper scraps organized and accessible with a set of clear plastic drawers. Each drawer can be labeled with free paint chips from your local hardware store, so artists can easily find the colors they need for their artwork.
Check out these additional options to make material management easier in your art room:
- 3 Simple Steps to Reassess and Reorganize Your Art Supplies
- 4 Simple and Budget-Friendly Ideas to Organize Your Ceramics Space
- Elementary Art Room Hacks Pack in PRO Learning
Media Center Visuals
Art teachers are known to create a welcoming studio environment for all of their artists. This comes with a lot of visuals to help guide students as they find materials, reference techniques, or reinforce vocabulary. Here are some ways to use visuals to help inform your students’ artmaking decisions.
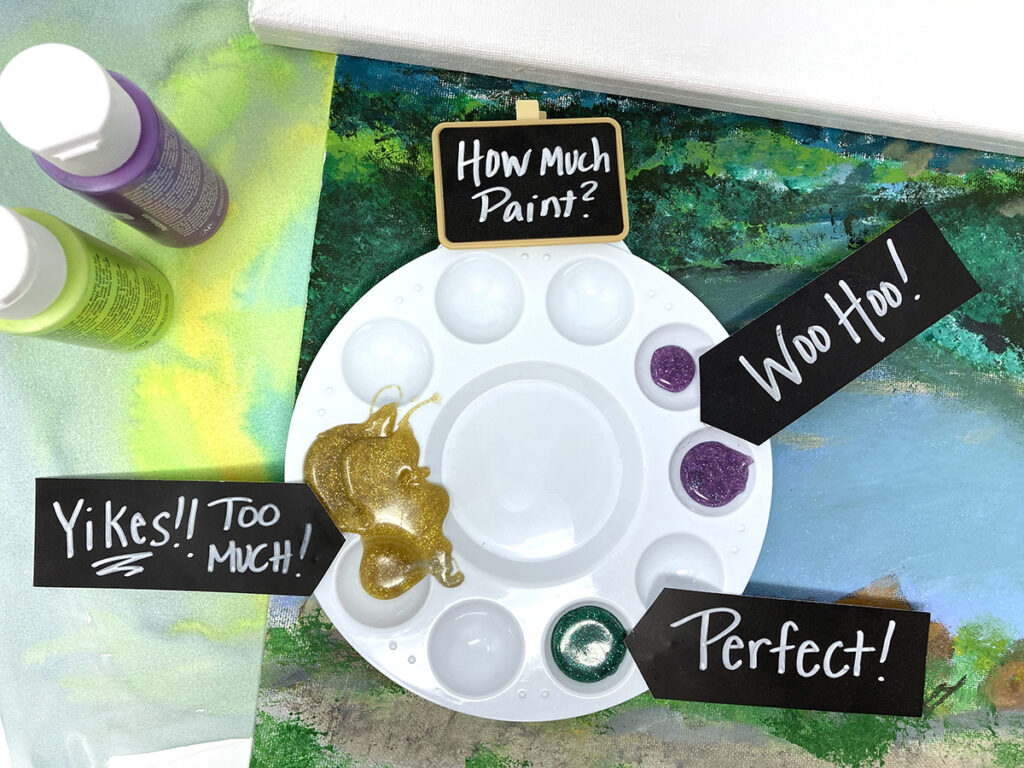
7. Get your hot glue guns and glitter glue sticks for a paint palette example. When art teachers begin training students about how much paint to use, we can sound like a broken record reminding them not to use too much. With this paint palette visual, shown in the picture below, students can see exactly how much they need when prepping paint. The colored hot glue represents the paint, and you can add as much or as little as you see fit in an inexpensive plastic palette from a local craft store. Add some little signs if you wish to drive home your expectations.
8. Create a Model Magic™️ menu of hand-building techniques. Consider preparing a display with hand-building options for your students to refer to after the lesson is over so they are ready for the hands-on experience. Model Magic™️ comes in multiple colors, air dries, and it can be hot glued to a canvas board. It is also great to keep around for future lessons and years!
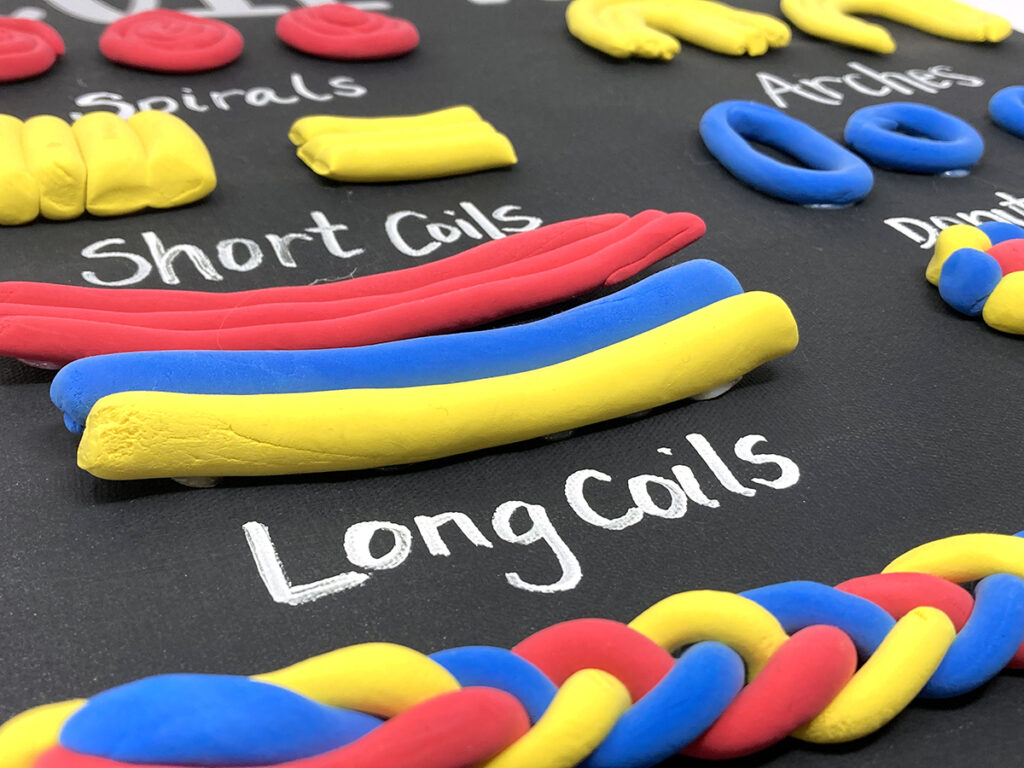
9. Show available materials with a 3D anchor chart. Visuals, like anchor charts, can provide information long after your demonstration is over. When preparing anchor charts for media centers, you can have some fun creating them yourself while also helping your students see what options are available for artmaking. To create a 3D anchor chart, start with a heavy background, such as a canvas board. Hot glue the materials you wish to show, add labels, and even a quick sample of what the material does. To add a tech-savvy component, post a QR code that leads to a video tutorial.

Project Ideas for Freebies
Sometimes, donations flood into the art room with or without your approval. You are tasked with sorting through all of the freebies and coming up with ideas to use them up. Let’s explore some ways to put all of those freebies to good use!
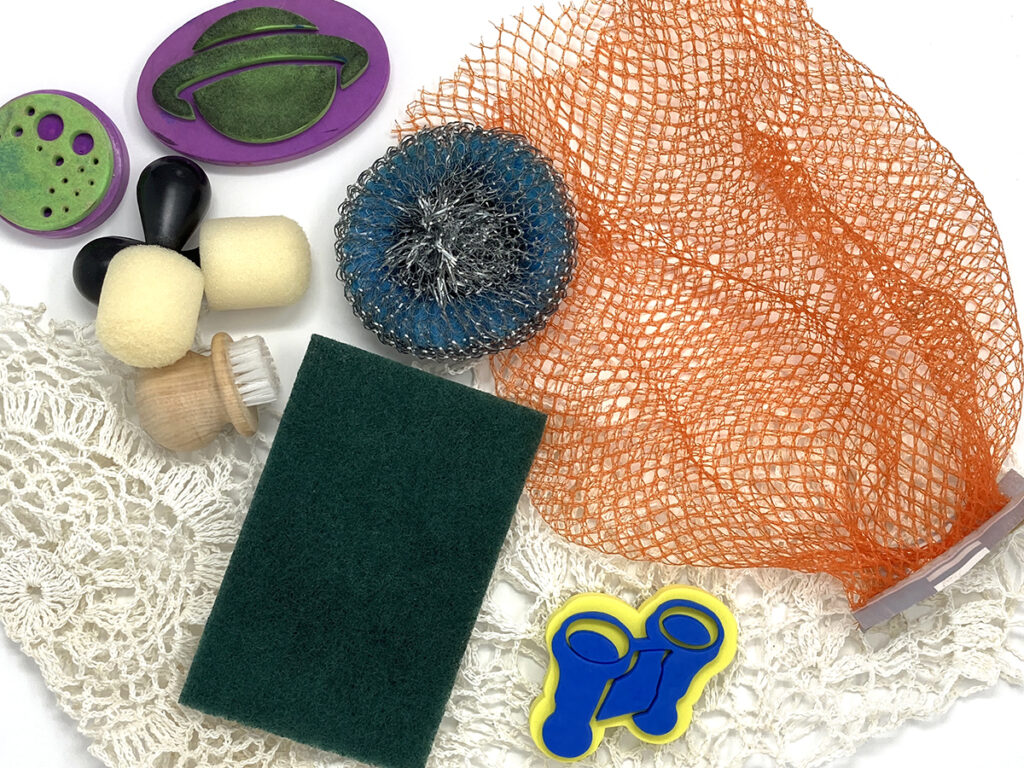
10. Turn textural trash into printmaking treasures. So many times, we throw out or dismiss items that could be used in our art rooms. Consider textural items that could serve an alternative purpose at a low or no cost at all. Mesh from citrus bags, bubble wrap, bottoms of glasses, doilies, or the tread on your students’ shoes can make interesting patterns and textures for your next printmaking lesson.
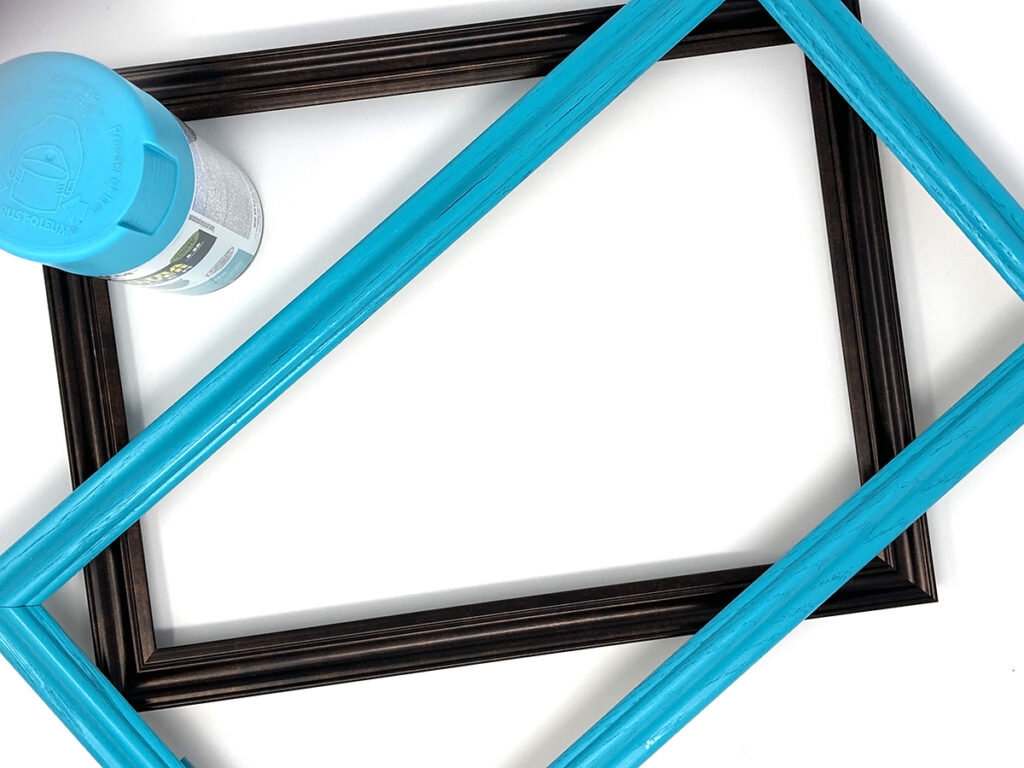
11. Spray paint old photo frames to beautifully showcase student artwork. If you are looking for a special way to display artwork around your classroom while creating an inviting atmosphere, try displaying student work in redesigned picture frames. You can find inexpensive frames at yard sales, dollar stores, or by putting a request on social media for family and friends to donate to your classroom. A coat of your favorite color spray paint will create a lovely touch when showcasing the artwork.
12. Ask the students for free advice. Art room hacks not only make life easier for you as the art teacher but also for your students who are using the room as their art studio. If you find something that isn’t flowing well in the management of supplies, invite your students to problem-solve with you. You may be surprised at their clever solutions!
Anytime art teachers find new and innovative ways to save time and manage the art room is a win! Whenever you think of brilliant ideas, try sharing them with your department, colleagues, or your social media groups. Learning from others and giving your own art room hacks can help everyone make the art room the best place to spend time.
Which art room hack are you going to try out?
What are your best time-saving hacks to make teaching art easier?
Magazine articles and podcasts are opinions of professional education contributors and do not necessarily represent the position of the Art of Education University (AOEU) or its academic offerings. Contributors use terms in the way they are most often talked about in the scope of their educational experiences.