There are many teachers hoping to try out a TAB model in their classrooms that get stuck at step one: Lesson Planning. How do you create a lesson when the kids are supposed make most of the decisions? Is “TAB Lesson Plan” an oxymoron? I don’t think so. Looking at it from the perspective of a project manager can help you design a TAB lesson that gives your students the right balance of structure and freedom.
If you’ve ever spoken to a project manager, you know there is a detailed process they follow to ensure their projects are successfully completed. Whether it’s designing new software or building a bridge, project managers follow a four phase process: Initiation, Design, Production and Presentation. This strategy also works remarkably well for designing TAB lessons at the high school level. The following is an example of how this strategy can be applied to create a choice-based lesson plan. I’ll go over the basics first, then we’ll take a look at an actual TAB lesson from my classroom.
The Basics
Initiation
The initiation phase begins when the teacher introduces a topic or a theme. These ideas can range from open ideas, such as “Artists Communicate,” to more specific ideas, such as “Identity.”
Design
During the design phase, students are tasked with creating written lists of ideas related to their themes. From these lists, they design thumbnails of possible art projects.
Meanwhile….
During the Initiation and Design phases, the class partakes in daily mini-lessons, where students are introduced to different mediums and techniques they might not yet be familiar with.
Production and Control
Once the designs are solid, the students are ready to create, choosing media that is appropriate for their designs. Based on their choices, they may need to explore and practice new media techniques before completing their projects.
Presentation
The students post photos of their work to their blogs along with personal reflections. The finished pieces are then presented for a class critique.
Case Study: 3D Scale and Proportion Lesson
This case study follows an actual lesson plan that used the method above.
Initiation
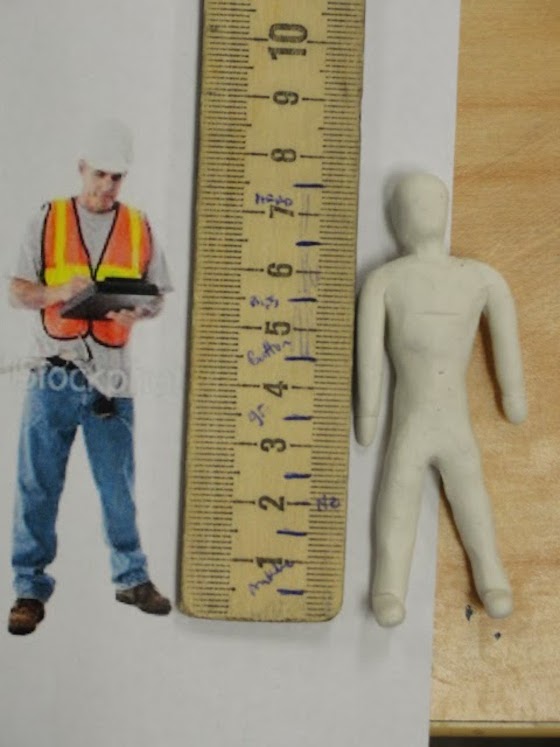
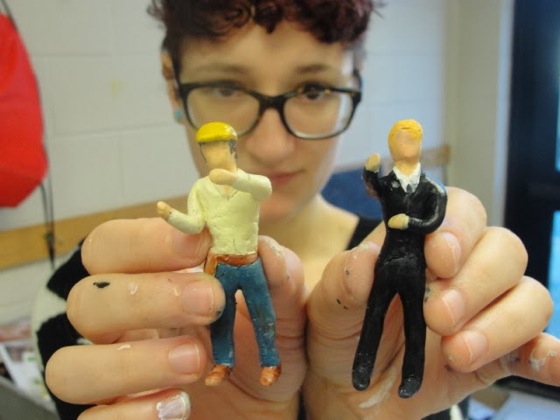
The initiation phase for this project began with the theme of “Questionable”. Along with the theme, two other constraints were applied to the project. The work being created had to be 3D and had to incorporate either the concept of proportion or scale. To get started, we looked at work by artists who incorporated scale or proportion in their work including Duane Hanson, Ron Mueck and Leonardo Da Vinci.
Design
During the design phase, students worked in groups, creating written lists of as many “Questionable” ideas they could think of. These lists were shared with the entire class. Later, each student created a personal list in his or her sketchbook. From these list, they designed thumbnails of possible art projects.
Meanwhile….
During the Initiation and design phases, the class participated in several mini-lessons. Since this was an Art Two class, the purpose of these lessons served mostly as a reminder on how to retrieve, work with, and clean up materials they were already familiar with, like clay. We also reviewed human proportion.
Production and Control
The range of ideas for this project went much further than anticipated. Though some students selected traditional clay as their medium, other ideas included using wax, paper mache and Sculpey. This generated the need for several new mini-lessons about using these materials. Other questions about facial proportions also sparked mini-lessons.
Note: From a non-TAB view point, this might look like excessive work. The question could be asked, ”Why weren’t these topics covered at the beginning?” However, this is the beauty of teaching in a TAB environment. In a traditional teaching environment, these question wouldn’t have been generated. In the TAB environment, the students were able to push learning about materials and techniques even further than I had anticipated.
Reflection
Each student took part in three kinds of reflection, which is typically how we finish these types of projects.
The first was to update their blogs twice, once prior to production when ideas and sketches were done and again once the projects were completed. The second was to participate in a Feel Good Friday. On a Feel Good Friday, all the work is displayed along with comment sheets. Students walk around the room, view other students’ work and leave comments. The third reflection is a group peer critique.
Of course, this is only one method for teaching TAB at the high school level, but it’s definitely working for our students.
How do you come up with TAB lessons? Do you do something similar?
Do you have a different method or structure to share? What has been successful or not so successful for you?
Magazine articles and podcasts are opinions of professional education contributors and do not necessarily represent the position of the Art of Education University (AOEU) or its academic offerings. Contributors use terms in the way they are most often talked about in the scope of their educational experiences.