Has this happened to you?
You’re teaching a lesson that is process based – possibly making clay pinch pots, weaving, or working through origami. You’re about halfway through and the kids are mastering the steps as you work hard to help anyone who falls behind. It’s hectic, but you’re making it work and it looks like you’ll get everyone through just in time to get the room clean. Suddenly, you hear a sound and look up.
It’s those five kids you thought were absent who were actually in another classroom making up a test. The teacher forgot to mention it and has sent them halfway through the period. “Nooooooooo! My lesson!!!” the voice inside your head cries as a huge wrench is thrown into the middle of your activity.
Fortunately, there is a helpful strategy to save you from this awful fate, with plenty of other classroom applications as well.
Enter, the anchor chart.
Anchor charts are visuals, often posters, meant to communicate important information through images and text. Because they are comprised of both words and pictures broken down into steps, they are an important resource for teaching to different learning styles and creating student independence. Anchor charts are essential if you teach students with limited English language proficiency because the images communicate the important information and provide access to content. If the teacher had an anchor chart in the scenario described above, she could have used it as a tool to get the latecomers started on the project.
There are two main uses for anchor charts: procedures and processes.
Procedures
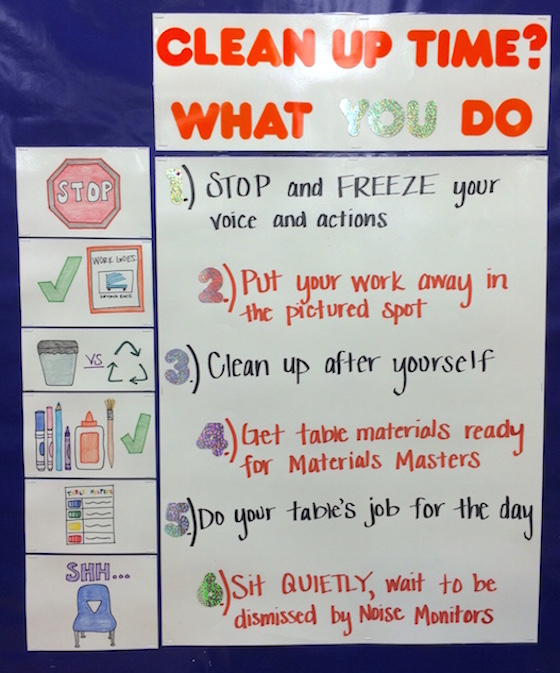
In my elementary classroom, I used anchor charts to describe routine procedures, like how to clean a paint brush, how to get yarn, or how to mix secondary colors. These signs and posters were permanently displayed in the classroom and were key in helping my centers run smoothly. I reinforced their use by directing students to them when they asked me related questions. Here’s a great example of a clean up anchor chart from AOE Writer Alecia Eggers.
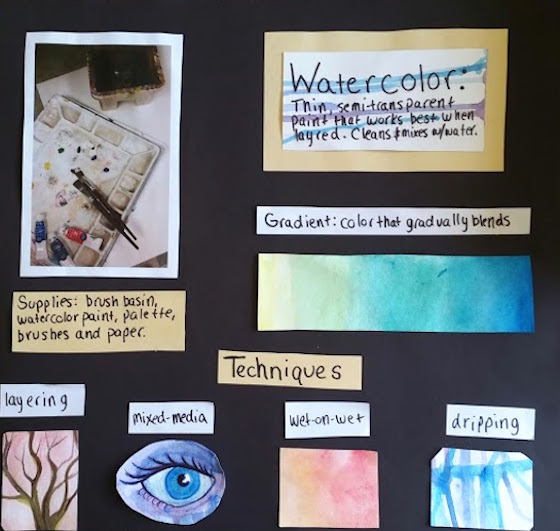
In my high school classroom, I’ve made them for commonly forgotten tasks like remembering to use palette paper when painting with acrylics. They are perfect for any information that’s important for students to know but hard for them to consistently remember. The example anchor chart below depicts watercolor set up as well as an overview of watercolor techniques.
Processes
Anchor charts are designed for capturing complex tasks that can be broken down into steps–think anything you teach with directions like first, next and last. I had a horrible time teaching paper weaving as a whole class lesson to my elementary students, but once I broke down the steps and created a visual, the lesson came together. Process charts can be used for whole-group lessons or self-directed learning. They are a natural fit for centers.
In my secondary classroom, my anchor charts are more text than visuals and hold more complex information. For example, I use a chart to describe how to set up for painting and another for how to decide between acrylic, tempera, and watercolor. Having this sort of information accessible to students is invaluable because it saves me from answering repetitive questions and frees my students from having to wait to talk to me before they make a decision.
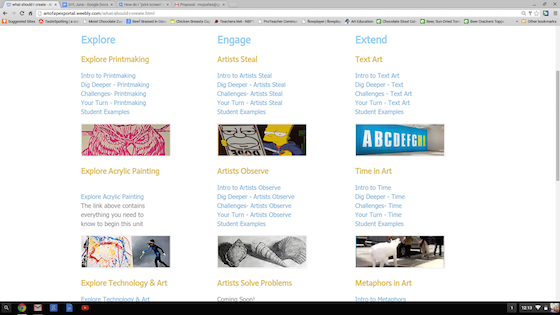
The concept of anchor charts can be taken further using technology. My department team collaborated to put together the Art of Apex Portal with a section dedicated to instructional videos. These videos function like live anchor charts, providing even more information and allowing any student with a smartphone or tablet instant access.
Make Your Own
So, are you ready to make your own anchor charts? Great! Here are 5 tips that will make sure yours are perfect.
1. Start by identifying needs.
Are there questions that you are repetitively asked? Are there processes that you would like to clarify?
2. Plan it out.
A good anchor chart provides clear information both visually and verbally. Take some time to think about the images that will best capture each step or idea. They might be photographs, drawings or diagrams.
3. Consider how it will be used.
Will it be used for whole-group instruction or in a smaller setting? Will students be able to see it from their seats or do you need one per table? These considerations will help you determine what size to make components and the level of detail that will work.
4. Find the best placement.
Ideally the anchor chart needs to be easily seen and near what it’s referencing.
5. Do what works best for you.
You can use the same concept to create a short video or slideshow that students can replay as needed. For students who have access to the internet, an online tool can also be helpful. In fact, this is one way you could flip your classroom!
Anchor charts are helpful tools that can streamline learning and save you time. If you aren’t using them already, give them a try!
Do you have an awesome anchor chart that you use? Post an image below.
Magazine articles and podcasts are opinions of professional education contributors and do not necessarily represent the position of the Art of Education University (AOEU) or its academic offerings. Contributors use terms in the way they are most often talked about in the scope of their educational experiences.