We have all seen the melted crayon projects from Pinterest. In fact, I saw so many last year during our genius hour presentations that I wanted scream. Melting crayons is fun, but there is SO much more you can do with the art of melting wax, also known as encaustic. I know it might sound dangerous or difficult, but I promise these three projects make it easy to introduce this medium in any classroom.
Note: Wax can give off harmful fumes, so be sure you are working in a well-ventilated area. In addition, these projects require heating elements. You will have to decide if they are suitable for your student population.
Project 1: Encaustic Drawing
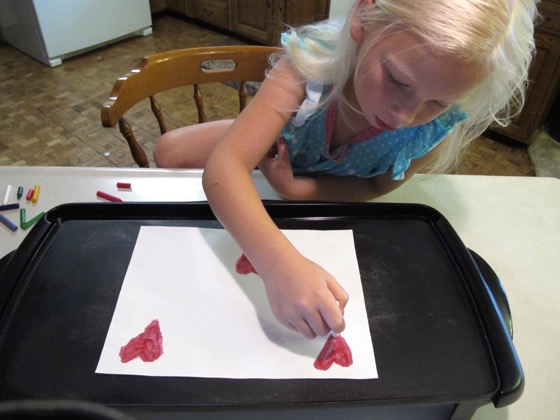
This simple project allows students to experience the magic of watching the colors melt and mix.
Materials
- Large warm surface, like an electric griddle
- Unwrapped crayons
- Drawing paper
- Low temp glue gun (optional)
Steps
- Warm the griddle –low or medium heat generally works well.
- Lay the paper onto the warm griddle.
- Draw slowly with unwrapped crayons onto the warm paper. As you draw, the crayons will melt to create a wax image.
- You can also “draw” by feeding the unwrapped crayons into a low temp glue gun. If you’d like more information, Allison from the site Learn~Play~Imagine wrote about it here.
Tips
- Put a larger paper under your drawing or mark out a border on your paper to prevent melted crayons from making it onto the griddle.
- Keep the wax thin and be careful with your finished drawings as thick areas of wax can crack and fall off.
Project 2: Encaustic Pouring
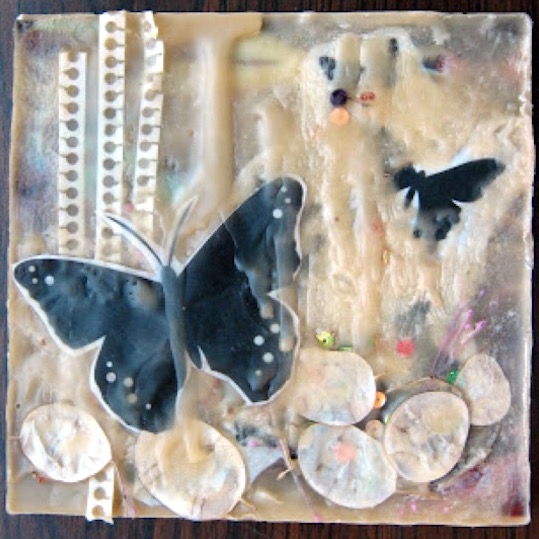
This project allows students to experience the magic of layering materials and wax to create beautiful images.
Materials
- Small board for each student
- Packing tape
- Beeswax
- HotPot (You might have one left from making ramen noodles in college.)
- Stuff for layering: leaves, lace, beads, photos, etc…
Steps
- Wrap the boards with packing tape to build up the sides (imagine making a fence).
- Lay materials onto the “fenced in board.”
- Pour melted wax in “the fence.”
- Repeat as desired.
Tips
- Pouring several thin layers of wax will help reduce how much things move.
- You can carve away areas of wax for emphasis.
- These ghost-like images can be drawn into for added interest.
Project #3 Encaustic Painting
This project is the most challenging in that it uses a true encaustic medium which is created using wax, resin and pigment. However, once the work of creating the “paints” are made, you will be creating for a very long time.
Materials
- Encaustic wax (find out how to make it here)
- Paintbrushes
- Rigid painting surface–a board works well
- Large warm surface, like a griddle
- Blow dryer
Steps
- Warm your pre-made waxes on the griddle. Old tuna cans with clothespin handles work great for this.
- Using the melted wax as paint, paint onto the rigid surface.
- Layer wax as needed.
- Move or change wax by heating it with a blow dryer once it is on the painting surface.
Tips
- Keep your colors pure by having students use one brush per color.
- Colors can be reheated and used until they are gone.
- You can press different things into the warm wax to create texture.
I hope these three projects get you thinking about how you might incorporate encaustic art into your classroom. I still remember my first experience with encaustic art. I was seven and we melted crayon shavings between wax paper to create a beautiful sun catcher that I was so very proud of.
If you are looking for a modern encaustic artist, check out the beautiful work of Margaret Berry. I was able to work with her a few years ago when her work was on display at our local art center. You can watch a video of her working here. Encaustic is one of those wonderful mediums that can be very simple or quite complex. Be warned that as you start investigating this medium, you might just find yourself addicted.
Have you ever taught encaustic art?
What new medium would you like to introduce your students to this next school year?
Magazine articles and podcasts are opinions of professional education contributors and do not necessarily represent the position of the Art of Education University (AOEU) or its academic offerings. Contributors use terms in the way they are most often talked about in the scope of their educational experiences.