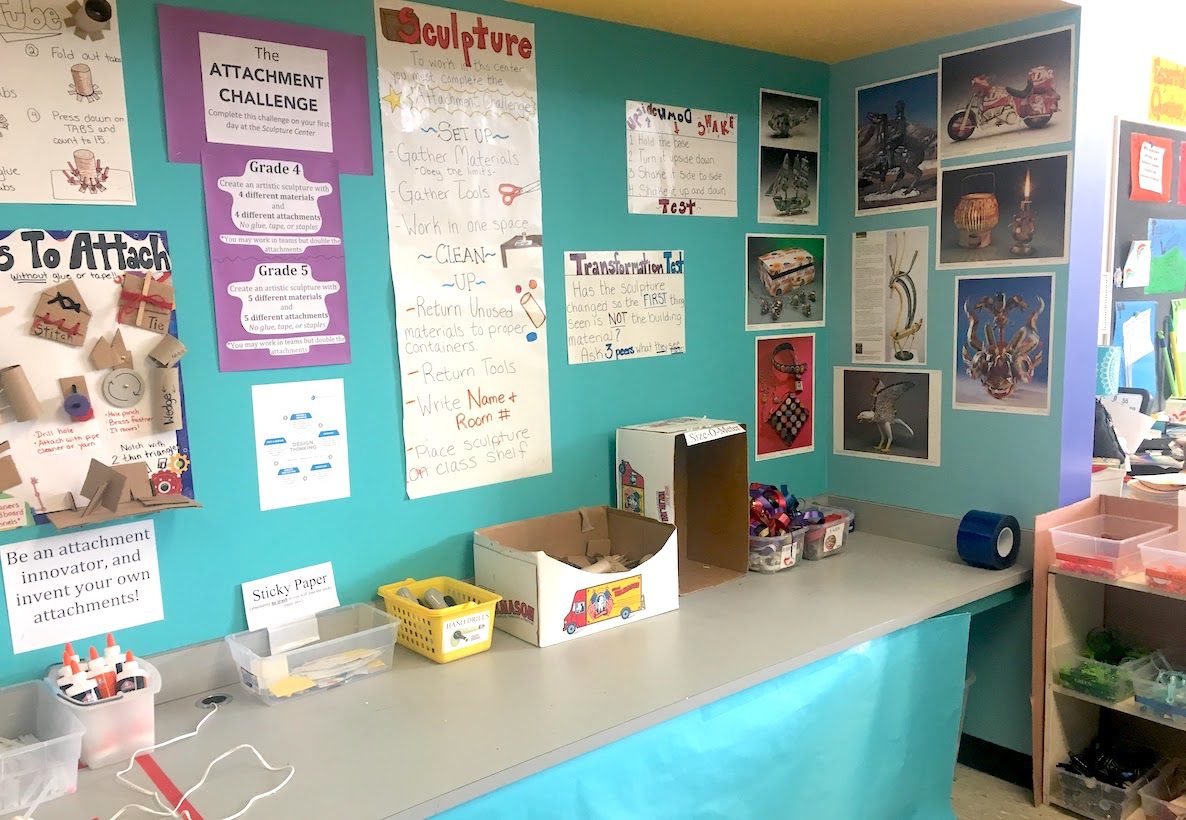
Sculpture projects engage even the most art-averse students. Unfortunately, most art teachers shy away from 3D lesson plans. It can be difficult to know what you need to buy and collect to make sure students are successful while working in three dimensions.
If you’re planning on having your students jump into sculpture this year, here are 12 must-have sculpture supplies to add to your supply list.
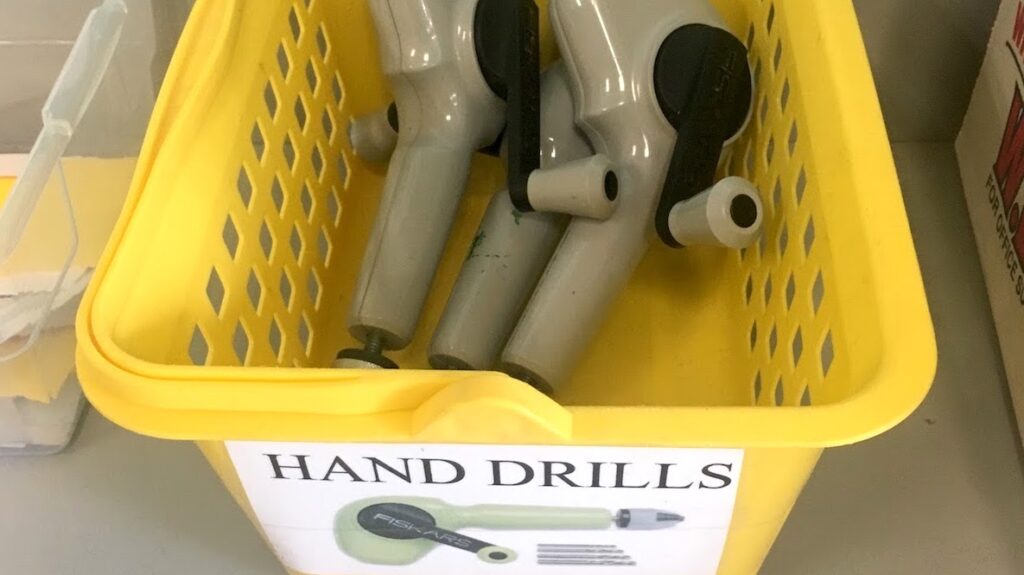
Hole Punches & Hand Drills
Why?
Creating small holes in sculpture materials is an important part of attaching sculpture materials together. Without hole punches or hand drills, students resort to stabbing with scissors, which can be unsightly, unfulfilling, and dangerous. Hole punches are great for creating a small hole in the edges of items like cardboard, while drills work better for making holes in the middle of larger items.
How?
Make sure to teach students exactly how to use hole punches and hand drills on their sculptures before setting them out for use.
Some important reminders include:
- Hole punches can only punch through thinner items like cardboard or sticky paper, while hand drills can be used on plastics and wood.
- Hand drills must be used with a partner. One person needs to hold the item being drilled while the other student drills to prevent the item from spinning. This means paying attention is key!
- Make sure to protect the tables from getting holes by placing a buffer between the item being drilled and your work surface.
- When finished drilling, use the “back out” method to prevent ruining the drills and your sculpture. While your partner is still holding your material, begin drilling backward while slowly backing out of the sculpture material.
- Last, teach students how to reattach drill bits when they become loose. Teaching students to care for materials without teacher assistance gives them a better sense of responsibility for maintaining the tools.
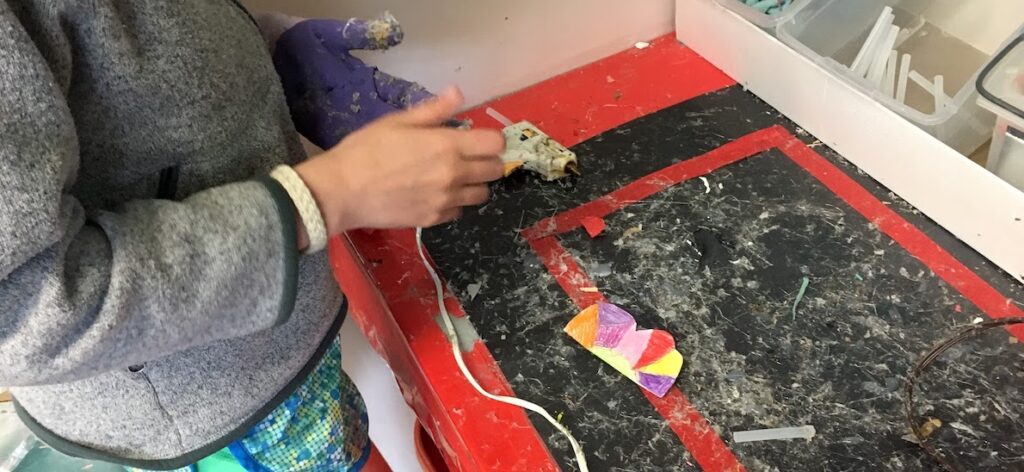
Hot Glue
Why?
Using hot glue guns with even your youngest students can be the key to unlocking some amazing student creations. Hot glue is immediate and has an element of danger that makes kids feel like “real” artists! It also cuts down on the need for projects to dry in a safe place, which makes storing larger projects much easier.
How?
Introduce hot glue as a supplemental adhesive. For instance, tell students they can hole punch and tie two pieces of cardboard together but can also add hot glue to strengthen the attachment. This prevents students from relying on the glue too heavily.
Be very explicit about safety but don’t instill too much fear. Include hot glue in your sculpture area or create an area just for hot gluing and limit the number of students who can be there at a time. You may need to come up with a time limit or sign up sheet depending on how popular hot glue is. To start, use low temp for students younger than middle school and require students wear coated gardening gloves and safety goggles. If your principal is not on board, perhaps you can share this blog post by Teacher Tom where he talks about his preschoolers using hot glue!
Last, if you’re using hot glue in your classroom set a reminder on your phone to unplug them at the end of the day. Elicit the help of your last class to remind you as well! As a final resort, make sure to let your custodial staff know so they can be an extra set of eyes.
Tacky Glue
Why?
Whether or not hot glue is in your comfort zone, tacky glue is a must either way! Tacky glue is a more permanent option but takes much longer to dry, so your kids will find it frustrating….but lots of learning comes from frustration.
How?
Teach students how to armature glued pieces with wire or tape to strengthen sculptures before and after gluing. Use the “15-second rule” to teach students to press down firmly and count to 15 when gluing to make sure the glue is starting to adhere. Allow them to experiment, fail, and reevaluate. This is design thinking at work!
For emergency cases, you may want to keep a high-temp hot glue gun in your desk for when student projects surpass the limits of low-temp hot glue or tacky glue.
Adult Scissors
Why?
Kids’ scissors just don’t cut it in with sculpture materials. On thicker materials like cardboard, they leave roughly cut edges, are often too short, and just can’t get the job done! Like using dull knives in the kitchen, relying on dull, rounded kids’ scissors can actually be more dangerous than using sharper ones.
How?
Buy a few high-quality shears, and keep them out or offer them as a sign-out material. Obviously, not all teachers are willing or able to supply their students will sharp adult scissors. In that case, spring for the best kids’ scissors you can get (like these) and your students will find more success and better craftsmanship results during sculpture projects.
Heavy-duty Paper Cutter
Why?
Cutting up cardboard quickly and easily is a must when creating sculptures. Unlike scissors, paper cutters cut smooth, straight edges in a few seconds without killing your fingers. Finished sculptures look more refined and students appreciate the smooth edges.
How?
If you work with younger students, have parent volunteers pre-cut cardboard for you. Show your volunteers exactly what you’re looking for and how to do it so you don’t waste any precious materials or time! Depending on the size of your paper cutter you may need to cut larger boxes down with scissors to fit in the paper cutter.
With older students, supply the paper cutter as a design tool. Teach students to “measure twice and cut once.” You can support this habit by limiting the amount of large cardboard they can use for their project while allowing unlimited access to the scrap box.
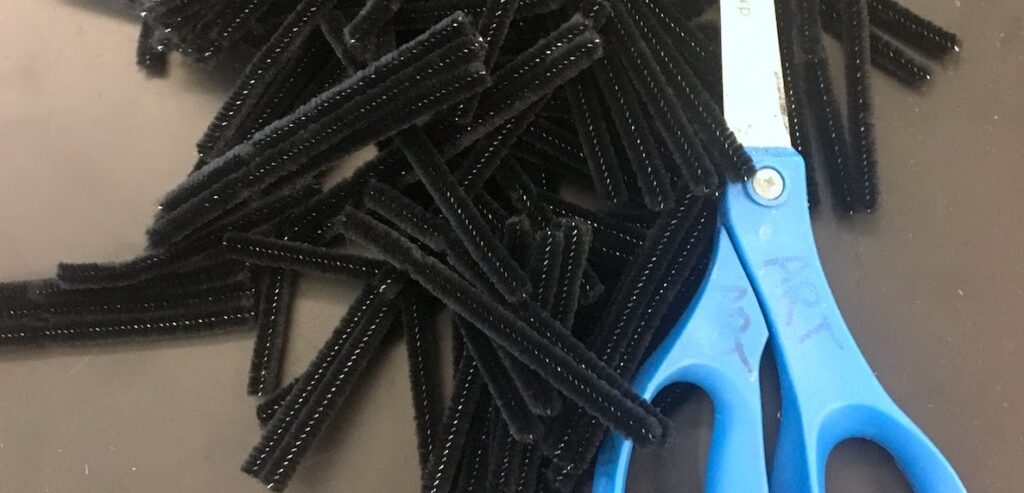
Pre-cut Black Pipe Cleaners
Why?
As a sculpture material, pipe cleaners are fun and easy to manipulate but they can often lead to “crafty” problem-solving. This is because students have always used pipe cleaners as craft materials!
For sculpture we want students to be able to identify the correct materials for the job. Pipe cleaners are a great material for flexible construction and armature…but how do we break their crafty reputation? You can do this by changing how you present the material.
How?
Only provide students with plain black pipe cleaners cut into small 2-inch lengths. This will undo the idea that this is the same material students use to make colorful bracelets at camp.
Show students how to drill holes in bottle caps, thread the pipe cleaners through, and create balled up wire at the end as a stopper. Teach students how to use the corrugation in cardboard to create a flexible joint. By highlighting the benefits and uses of this strong and pliable material, you’re teaching students how to analyze materials for their properties just like an engineer would.
Brass Fasteners
Why?
Another traditional craft material, brass fasteners are a great way to create movable parts in sculptures.
How?
Make sure students know brass fasteners should only be used to attach two or more items that will spin. This will prevent students from using them as embellishments, and they will begin to see them as a useful building material.
Experiment prior to working with students to create a few examples. Look at layering a variety of sizes, colors, and shapes to create interesting visual and physical outcomes such as peek-a-boos, pointing arrows, or movable arms.
Paper Towel Tubes
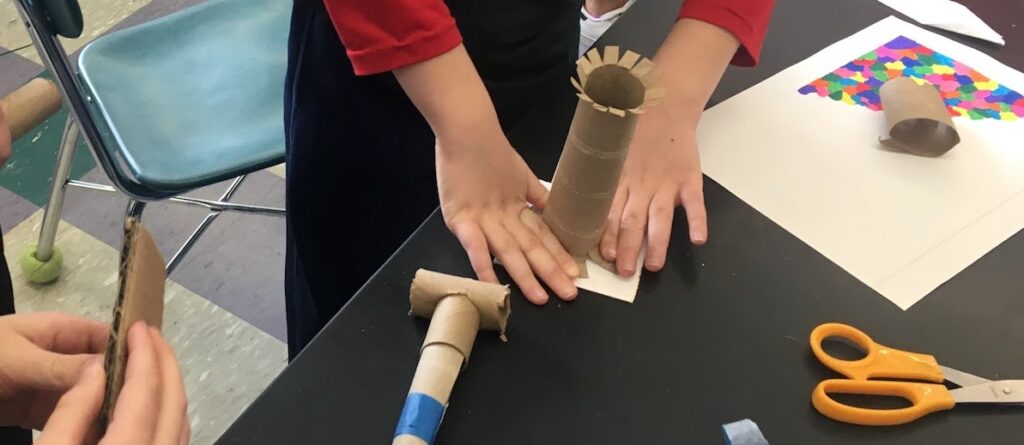
Why?
Tubes are a super versatile, free building material art teachers have been using for years. Students can easily collect tubes from home, making it easy for you to keep up with demand. They also offer interesting shapes and benefits as hollow, round and sturdy objects to color or even paint.
How?
Add this item to the top of your list of needed supplies. Make sure to post the list on your website, send it home with students, and also remind your kids to keep collecting them at home.
When teaching students how to use tubes as a sculpture material, show them how to cut short tabs in the bottom of the tubes, use tacky glue, and press on the tabs for 15 seconds for the glue to adhere. This gives their tubes more surface area to attach, which leads to stronger sculptures.
Bottle Caps
Why?
Plastic bottle caps are colorful, easily drilled into and come in a wide variety of shapes and sizes. Like tubes, they are easily collected at home to keep your sculpture center up and running.
How?
There’s no right way to use a bottle cap, but teaching students how to drill through them and attach them with pipe cleaners, brass fasteners, and string can lead to some interesting kinetic results!
Sticky Paper
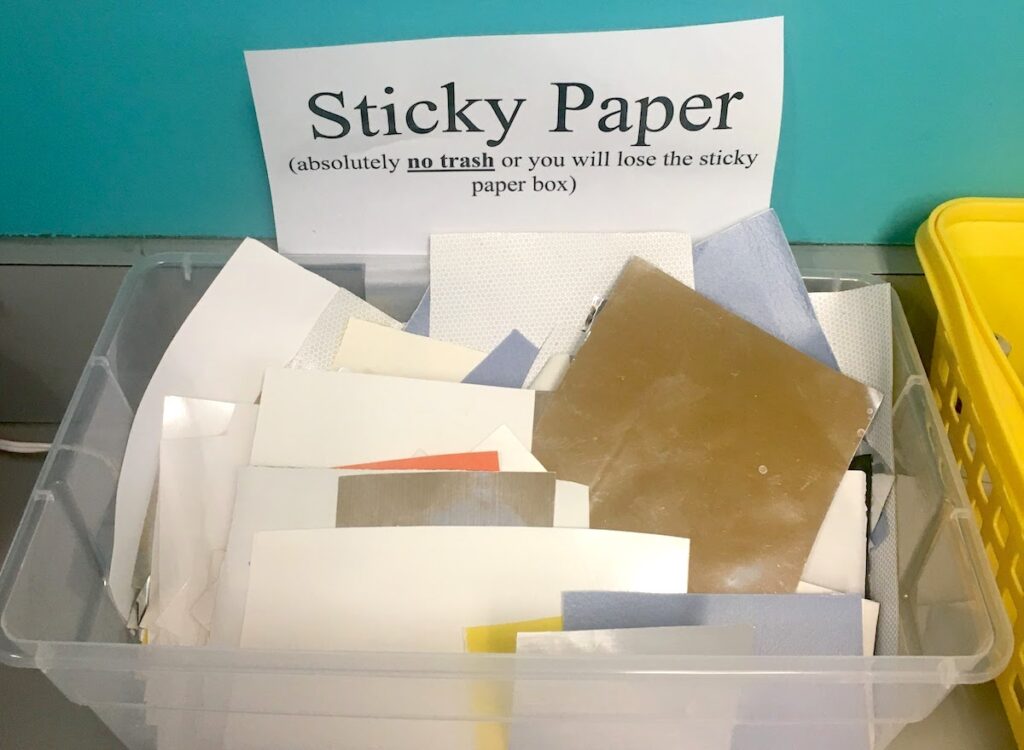
Why?
Sticky paper has two important uses. It can be used as adhesive and as an embellishment. This means while they strengthen their sculptures, students can also be transforming the outside “skin” from plain to colorful. For your younger students, it can be a great fine motor skill builder to peel off the backing!
How?
Try to score large rolls from overstock at local businesses such as sign companies, hardware stores, or technology fabricators. If you can’t find it for free, you can buy smaller rolls of it with your budget.
Pre-cut Cardboard
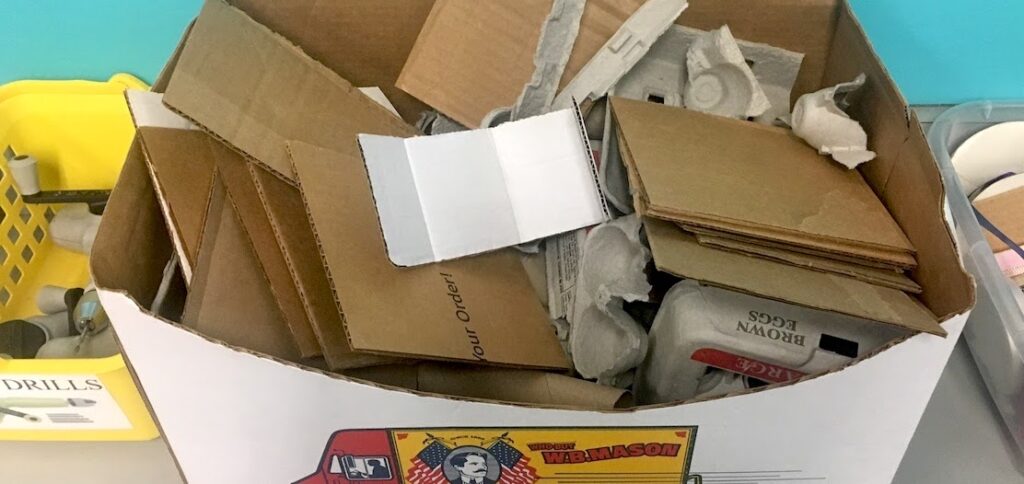
Why
Cardboard is by far the most used sculpture material in Choice, TAB, PBL, and DBAE sculpture lessons. It’s extremely versatile and inexpensive.
How
When working with cardboard, it seems simple and fun to provide students with big uncut boxes and let them explore. Unfortunately, this poses a few problems.
Providing students with uncut boxes or large pieces of cardboard initiates one of two desires in children; either they fill it with stuff or they draw on it. Then you have kids who are simply embellishing instead of sculpting. In addition, students end up wasting large amounts of cardboard because they cut small pieces from the center. Finally, the cardboard ends up being wonky and uneven because students can’t easily cut the larger pieces.
The solution to all of these problems is providing smaller pieces from the start. With smaller pieces, students are required to find ways to attach or build to create the shapes they need. In addition, offering small pre-cut pieces improves the quality of craftsmanship, especially in younger students’ work.
Setting up sculpture projects can seem overwhelming and difficult. Try to remember sculpture creates an environment where students are naturally engaged and practice collaboration and problem-solving. As long as students have a variety of tools and materials they can use, their projects will be successful.
If you’d like even more ideas, check out the Foolproof Methods for Teaching Beginning Sculpture Learning Pack where you can discover new lessons and ideas that can be used with a variety of materials!
Do your students have a favorite sculpture supply?
What’s your must-have tool or materials for 3D projects?
Magazine articles and podcasts are opinions of professional education contributors and do not necessarily represent the position of the Art of Education University (AOEU) or its academic offerings. Contributors use terms in the way they are most often talked about in the scope of their educational experiences.