In the art room, watercolor paint can be a bit of a Dr. Jekyll and Mr. Hyde situation. On the one hand, it’s inexpensive and readily available. It can be used for a variety of projects, from beginner to advanced. On the other hand, watercolor has its drawbacks. Many art teachers don’t have formal training in the medium, and students can find it difficult to control. So what’s an art teacher to do?
Starting with the Basics
According to Andrea Slusarski, facilitator of the Watercolor Painting Basics PRO Learning Pack, the key is building a solid foundation. When Andrea teaches watercolor, she starts by demonstrating basic brushstrokes and techniques.
Andrea says that starting with the basics is important, because each brush and technique serves a different purpose. Once students understand the basics, they are better able to choose brushes and techniques to give them a specific desired result. You can see the brushes and techniques she introduces to her students outlined below.
Interested in seeing Andrea demonstrate these brushes and techniques on camera? Be sure to check out the Basic Techniques video in the Watercolor Painting Basics PRO Learning Pack.
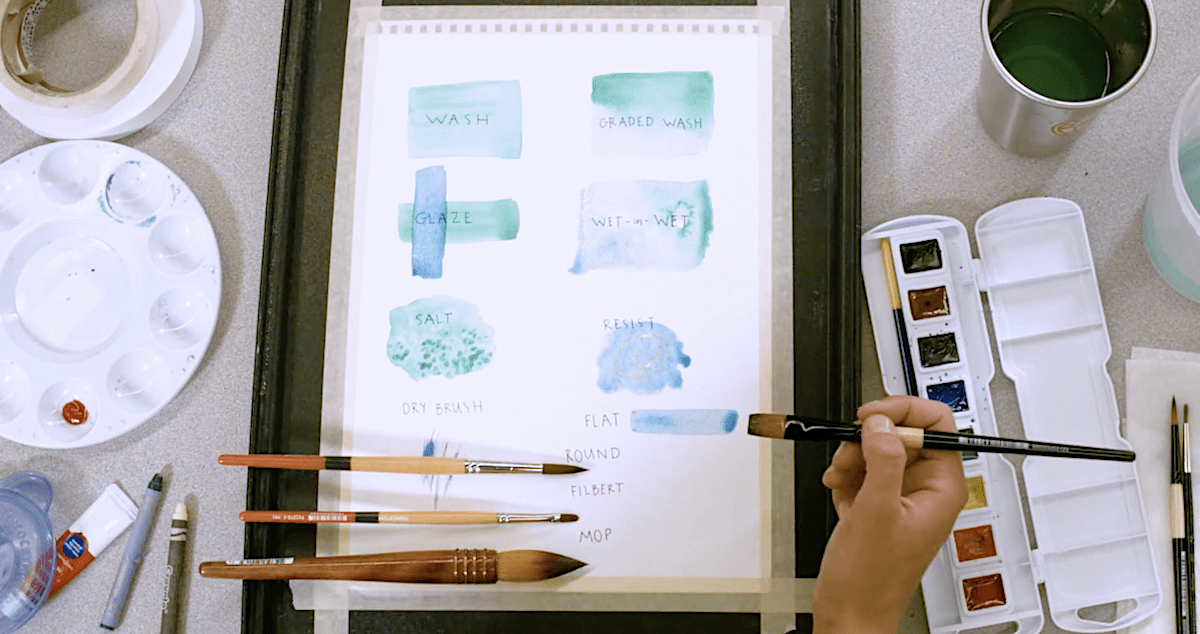
Brush Types
Flat

A flat brush has squared-off edges and creates crisp strokes. Flat brushes are best for creating washes and filling in large spaces like backgrounds.
Round

A round brush has a tapered end that comes to a point. It can create a thick or thin line depending on how much pressure the artist applies. Round brushes are best for filling in small areas and adding details.
Filbert

A filbert brush is similar to a flat brush, but has a slightly tapered edge. Filberts are versatile as they can cover a lot of space yet easily follow a curved shape.
Mop

A mop brush is a soft brush that can hold a lot of water and pigment. This type of brush is also good for large areas and backgrounds.
Techniques
In addition to teaching her students about basic brushes, it’s also a good idea to show your students some foundational techniques. Once again, it’s important to tell students what each technique can be used for so they can make informed decisions while painting. Here is what Andrea recommends.
Wash
A wash is when you lay down an even layer of pigment over a large area. A wash is the perfect technique for covering a large area, like a sky or background, fairly quickly.
Graded Wash
A graded wash is a wash that has a gradation of color, fading in saturation from one area to another. Like a regular wash, this gradient version can be used for skies, seas, or other backgrounds.
Glaze
To create a glaze, first create a wash. Once the first layer is dry, add another wash on top. Letting the first layer dry prevents the colors from mixing together.
Glazes work well when you want to build up layers in a painting with more control.

Wet-on-Wet
When an artist works “wet-on-wet” it means they are adding wet paint to a wet piece of paper. When the wet paint hits the wet paper, it creates unpredictable results. This technique is perfect for things like clouds.
Salt
Adding salt to a wet area of a painting can produce an interesting textured effect. As the are dries, the salt will absorb some of the paint leaving certain areas lighter than others. This would be a good technique to try if you’re trying to capture a rough texture or paint something like sand or pebbles.
Resist
There are a variety of ways to create an area of resist in a painting, from a simple wax crayon to special masking materials. Whatever you choose, laying down a resist will prevent paint from covering a specific area. This technique is sometimes used for tiny details or to create interesting, layered effects.
Dry Brush
Dry brushing describes when an artist uses a dry brush with very little pigment on it to create textured brush strokes. The dry brush technique works well for adding details to areas like grass or hair. Dry brushing should happen at the end of your painting. Otherwise, additional water may activate the pigment, distorting your work.
Allowing Time for Practice
While it’s important to demonstrate techniques for your students, don’t forget to allow them time to practice and experiment. Remember, different elements in a painting are going to require different techniques. The more comfortable students get with the basics, the better they will understand how and when to use them.
As students begin to experiment and practice, Andrea suggests that teachers walk around the room to formatively assess student skills. It’s important to catch mistakes early so that students can proceed with confidence. The biggest thing to watch for is that students are getting the ratio of pigment to water correct. Too much pigment can be opaque and sticky while too little pigment leaves a student with a watery paper and not much in the way of artwork.
To Learn More
These basics are just the tip of the iceberg in terms of what you need to know to help your students become competent watercolorists. If you’re interested in learning more, a simple Internet search can turn up tons of options.
Here are three resources we recommend.
Watercolor Painting Basics PRO Learning Pack
This PRO Learning Pack takes you through everything you need to know to get your students started with watercolor. Andrea covers everything from the basic techniques seen in this article to materials, organization, and beginning projects.
Color Theory through Watercolor PRO Learning Pack
This PRO Learning Pack builds on the basics pack and takes you deeper into watercolor by looking at it through a lens of color theory. You’ll learn how watercolor’s unique qualities lend themselves specifically to color theory and how to apply these strategies and techniques for any age level.
Studio: Painting – Watercolor Course
If you’re looking for an even deeper dive into watercolor, be sure to check out AOEU’s Studio:Painting – Watercolor course. This course addresses all the questions you might have about watercolor, while letting you explore your own studio practice! As the course description states, “Topics will include brush selection, material management, color theory, visual journaling with watercolor, as well as basic and advanced techniques for the art room. Even better, you will have dedicated time to explore the medium of watercolor and advance your own practice as an artist and as a teacher.”
It’s easy to leave things we feel wary about out of our art curriculums, but doing so is a disservice to our students. Whether you’re a watercolor novice or expert, you’re sure to find something new in the resources above to bring into your classroom! Starting with the basics and building from there will have your students creating beautiful work in no time!
Do you teach watercolor in your classroom? What techniques do you start with?
What are the best tips you have to share?
Magazine articles and podcasts are opinions of professional education contributors and do not necessarily represent the position of the Art of Education University (AOEU) or its academic offerings. Contributors use terms in the way they are most often talked about in the scope of their educational experiences.