Note: Be sure to review all resources and preview all artists before determining if they are appropriate to share with your students.
You’ve probably heard the phrase, “A picture is worth a thousand words.” This is so true when it comes to photography! Photographs can be more than a picture or capturing a moment. They can be a powerful way to convey feelings, ideas, and stories in an instant without words. If you’ve started to bring photography to your students, now’s a great time to consider ways to level up their work and boost their communication skills.
Support your students to read and create powerful photographs with the five ideas below!
What is visual literacy?
Before we dive into specific ideas and strategies, let’s establish what visual literacy is. Literacy is the ability to read and write. Visual literacy is very similar! Visual literacy is the ability to read and create images. Having strong visual literacy skills allows students to interpret images and their meanings based on composition, color, and subject matter. These skills also enable students to clearly communicate their ideas through their art.
Visually literate photography students can:
- Interpret images based on their style and composition.
- Examine the meaning and purpose behind images.
- Assess the quality and credibility of pictures and their sources.
- Use images and visual media to effectively convey a message.
- Develop and produce impactful photos and visual media.
- Analyze the broader context of image creation and use, including ethical, legal, social, and economic considerations.

1. Introduce basic concepts.
Learning basic photography concepts is crucial for developing visual literacy. Understanding different camera types and settings with the proper terminology empowers students to explain their creative decisions. It also equips them to effectively interpret and discuss photographs. Use word banks and sketchnotes to help students build essential vocabulary.
Here are two basic areas to cover:
- Introduce different types of cameras and their components.
Expose students to a range of cameras such as digital, pinhole or film, and smartphones. Discuss how each type of camera affects the image quality and creative possibilities. Students can do a quick sketch of each camera and label it with features. - Teach students about aperture, shutter speed, and ISO.
These are key terms and techniques. Give them a memorable definition for each and time to play and experiment. Manipulate depth of field and control the focal point with aperture. Create motion or blur effects to simulate the passing of time with shutter speed. Adjust ISO settings to explore brightness and noise.
2. Explore different genres.
Exploring various photography genres helps students understand different visual languages and gain fresh techniques. Both of these will enhance their communication skills and artwork. While there are many genres, two simple yet powerful ones to start with are landscape and still-life photography.
1. Landscape Photography
Landscape photography captures the great outdoors! Students can focus on how space and composition create a sense of place. Techniques like leading lines and depth of field are crucial for conveying distance and scale. Encourage students to observe how the different elements in natural and man-made environments contribute to the overall image.
Ask students what they think a landscape is. You’ll probably get responses like, “It’s art that shows land!” This is a great start. Connect their definitions and examples to the origin of landscapes in art. Next, share an iconic landscape photo, such as The Tetons and Snake River by Ansel Adams, for students to “read.”
Guide students through the following “reading” exercise:
- Where does this scene take place? (Time of day, location, etc.)
- What do you see first? (Focal point)
- What do you see next? How did your eye travel there? (Leading lines/movement)
- How do you think the photographer took the photograph? (Empathy and technical analysis)
- Write down 2-3 sentences describing the landscape with several adjectives.
- Share a select few with the class.
2. Still-Life Photography
Teach the importance of arranging objects and using lighting to highlight textures and details. Students learn to appreciate how the placement and lighting of objects can tell a story or evoke a mood. Focus on the subtle details to enhance students’ ability to see and capture the intricate aspects of everyday objects.
Ask students what they think a still-life is. Students may say something like, “It’s things from life that don’t move!” Discuss the origins of still-life art. Explain that still-life photography involves capturing inanimate objects arranged to create a visually pleasing composition. Share a still-life photograph, such as Pepper No. 30 by Edward Weston, for students to “read.”
Guide students through the following “reading” exercise:
- What object(s) do you see in the photograph? (Subject matter)
- What do you notice first? (Focal point)
- How are the objects arranged? (Composition)
- What textures and details stand out to you?
- How does the lighting affect the mood of the image? (Value)
- What story or message do you think the photographer is trying to convey?
- Have students write 2-3 sentences describing what they see with several adjectives.
- Share with partners.
3. Ask critical questions.
Just like with researching or learning any topic, it all starts with good questions. Getting students to ask good questions when looking at a photograph begins with us modeling good questions! Select an appropriate photograph or use an image of the week. Provide time to observe the photo before beginning a discussion. Try a Visual Thinking Strategy (VTS) to promote discussion, critical thinking, and evidence-based debates. These activities help students to break down the visual elements in a photograph, much like they’d break down literary elements in a poem or short story. Once students develop these strategies, apply them to their own artworks for a critique!
Here are three simple questions to ask:
- What’s going on in this picture?
- What do you see that makes you say that?
- What more can you find?
4. Tell a dynamic story.
Making the shift from creating pretty photos to photographs that tell a story allows the visual literacy component to shine. This process requires both technical skills and conceptual thinking. Begin by showing students photo essays, narrative photography, or a series of images that effectively tell a story. Compare and contrast them to how a comic strip or children’s picture book works. Identify and explore choices made by the photographer like color scheme, composition, layout, and mood.
Try A Day in the Life (DITL) Photo Story activity.
This assignment involves students documenting a full day in the life of a person (them or someone else) through a series of photographs. The goal is to capture the daily routine, significant moments, and unique details that tell a comprehensive and engaging story.
- Show students A Day in the Life of the President by White House Photographers.
- Identify the elements of what makes a story. For example, a story typically includes an introduction, rising action, climax or turning point, falling action, and conclusion.
- Share how different points of view can add interest to photographs.
- Students will take 5-10 photographs to tell a story or narrative of the day.
- Students will use composition (such as the rule of thirds, leading lines, or framing) to guide the viewer’s eye and enhance the storyline.
- Students will use color and detail to emphasize important elements in their photos to convey emotion or a theme.
- Reflect on the process and their final photography collection.
5. Discuss the impact of photography.
Exploring photography’s impact on society throughout time gives students a deeper understanding of how images can shape opinions, document events, and advocate for causes. It also raises awareness of diverse perspectives and ethical considerations and makes connections with other content areas. Well-rounded and thoughtful photography students will produce more intentional and meaningful images.
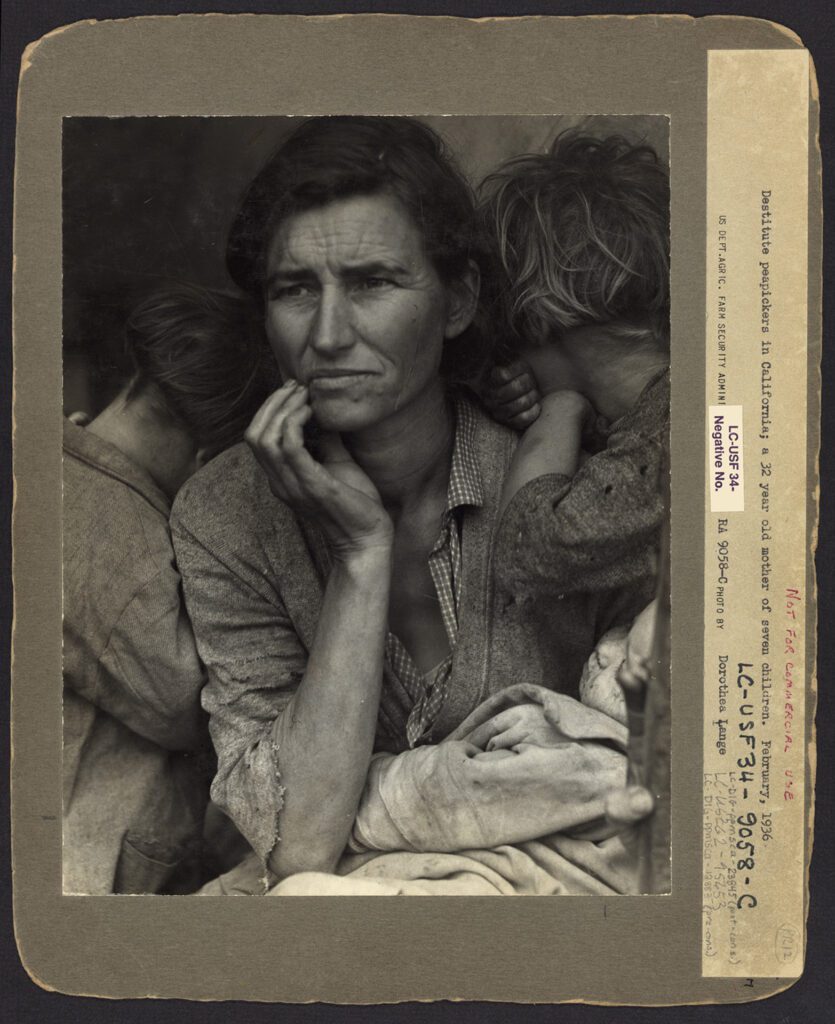
Share real-world examples of impactful photography, such as iconic photojournalistic images like Dorothea Lange’s Migrant Mother. Provide historical and cultural context by giving the students a brief overview or facilitating student discovery. Dorothea Lange, an American photojournalist, took this particular photograph during the Great Depression, a period of severe economic hardship in the 1930s. The image depicts Florence Owens Thompson, a destitute pea picker in California, holding her children while looking anxiously into the distance. Lange was working for the Farm Security Administration (FSA), a New Deal agency aimed at documenting the plight of impoverished Americans and advocating for their needs.
Prompt student discussion with the following questions:
- What makes Migrant Mother such a powerful image?
- How did Migrant Mother influence public perception during the Great Depression?
- How do images in current news articles shape the narrative of a story?
- In what ways do photographs influence our emotions and opinions about news stories?
- How can we critically analyze the use of images in media?
Integrating photography into the K-12 art room is a fantastic way to boost visual literacy among students. Students gain a deeper understanding of how to interpret and create images that are meaningful and conceptual. Start by establishing basic photography terms and introduce genres like landscape and still-life. These equip students with foundational vocabulary and processes to speak and write about photography! Teach students how to ask and answer good questions to analyze photos, tell visual stories, and discuss real-world impacts to level up your students’ visual literacy skills. With these tools, students will read and compose images with a critical and thoughtful lens, learning crucial skills to be effective life-long visual communicators.
What’s your favorite way to incorporate visual literacy using photography?
How do you prompt students to ask good questions when examining a photograph?
To continue the conversation, join us in The Art of Ed Community!
Magazine articles and podcasts are opinions of professional education contributors and do not necessarily represent the position of the Art of Education University (AOEU) or its academic offerings. Contributors use terms in the way they are most often talked about in the scope of their educational experiences.