Note: Be sure to review all resources and preview all artists before determining if they are appropriate to share with your students.
Are you searching for a way to engage students amidst the constant stimulation from technology, devices, and screens? If your students love to snap photos with their Chromebook or phone, introduce them to pinhole photography! Pinhole photography is a great way to tie something students love with innovation and science. Keep reading to discover what pinhole photography is and why it’s so special.
Let’s take a look at what pinhole photography is, if you really need a darkroom or not, and five reasons pinhole photography is an art form of love!
What is pinhole photography?
First, let’s talk about what a pinhole camera is and where it originated from. The camera obscura, Latin for “dark room,” is a perfect art history component to introduce with pinhole photography. The camera obscura was the first drawing aid used by artists in the old days. In a nutshell, a camera obscura is a darkroom with a small opening. The opening allows light into the “room,” which then projects the outside world onto the surface on the opposing side. The image will be inverted because light travels in a straight line.
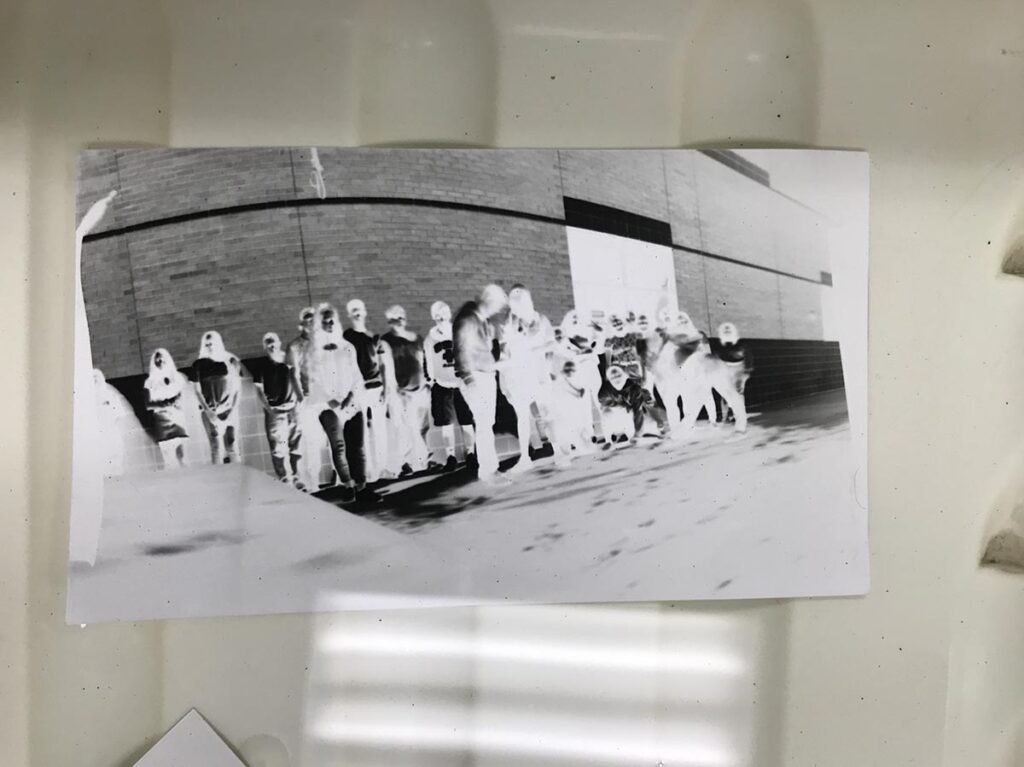
A pinhole camera is a camera obscura with film material inside to record the image. Students can make pinhole cameras out of everyday items. Pinhole photography is a basic form of taking pictures using a simple camera without a lens. Instead of a lens, it has a tiny hole that lets light in. This light creates an upside-down image on a special light-sensitive paper inside the camera. It’s a hands-on and creative way to make unique, often dreamy-looking photos.
What if I don’t have a darkroom?
If you don’t have a darkroom or cameras, there are many ways you can incorporate photography into your art room. However, if you are passionate about keeping darkroom photography alive—set one up! While darkrooms can take a lot of extra love, care, and attention, they are easier to get up and running than you think. Two big factors to consider before converting your space are proper disposal of chemicals and ventilation to the outside to remove fumes. If you are worried about the toxicity of darkroom chemistry and the environmental impact, use non-toxic substitutes!
Building a temporary darkroom space may seem daunting, but it’s not impossible! My storage closet goes through a conversion each year for this unit. The reward of seeing the joy and excitement on students’ faces is well worth the prep and planning! See what a darkroom photography class looks like in the Day in the Life of an Art Teacher episode with Tasha Newton, below.
1. Breaks the monotony of digital devices.
The quick and straightforward process of digital photography can become monotonous to students. The instant gratification of digital photography can lead to a sense of routine and predictability. There is no mystery to the final product with digital photography. Traditional methods of photography, including pinhole photography, provide a sense of surprise and anticipation. Pinhole photography builds the ownership and investment that goes into taking a single photograph. Students crave the hands-on experience of constructing a pinhole camera and developing their own prints in the darkroom!
2. Makes cross-curricular connections.
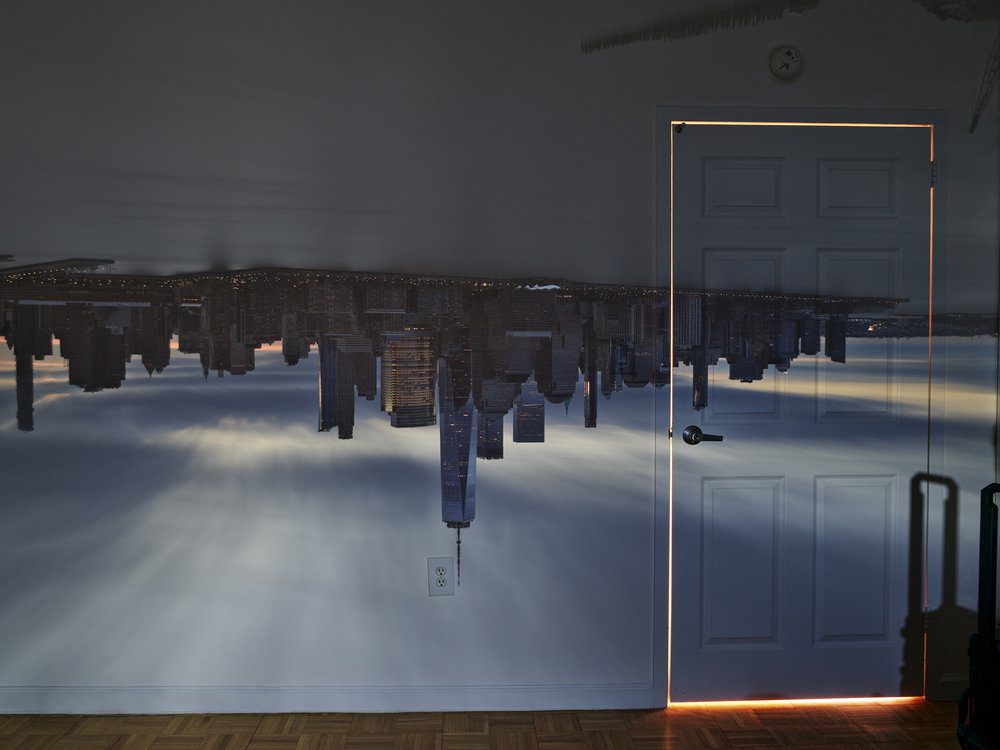
There are a multitude of cross-curricular opportunities with pinhole photography. The study of pinhole photography crosses over to history, science, and math. The camera obscura is a perfect way to incorporate history as students investigate how artists used it as a drawing aid to render perspective views. If you have a window in your classroom, the entire classroom can be transformed into a camera obscura with basic materials. Show the work of Abelardo Morel who is utilizing historical methods to create art today.
3. Encourages patience and resilience.
The immediate nature of digital photography encourages an attitude of instant gratification. Pinhole photography makes students slow down and fall in love with the process of making a photograph. Creating a good exposure from a pinhole camera can be trial and error due to variables like weather and lighting. The problem-solving and experimentation to achieve a properly exposed print engages students’ curiosity and critical thinking skills.
Have a camera already tested for light leaks and exposure times before the lesson. Create the camera and test it or purchase one in advance. This will dip students’ toes in with a quick win to generate excitement. Once students have their exposures nailed, they can push their creativity further by exploring multiple exposures or ghost prints using their own pinhole cameras.

4. Embraces the power of simplicity.
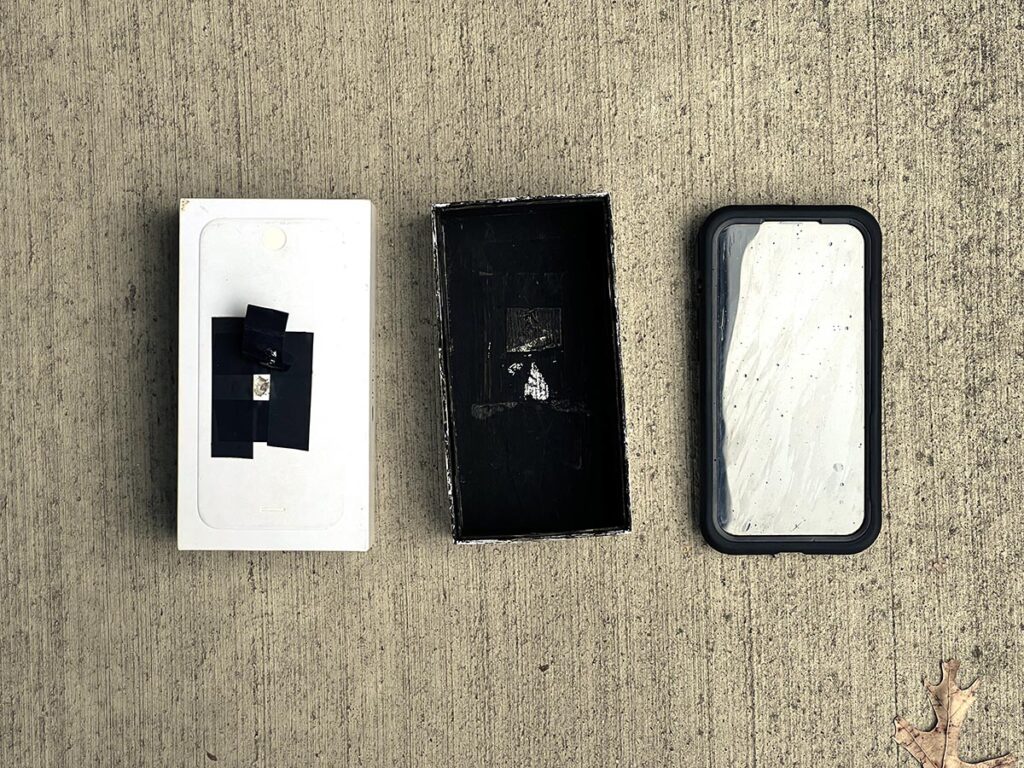
Aside from darkroom chemistry and paper film, the pinhole camera only requires basic materials to construct. Take a few minutes to find these materials—they’re probably already in your classroom! Watch students’ jaws drop in awe when they see how to make a photograph with just a few simple things. What’s not to love about simplicity?

Here are the materials you’ll need:
- Light-tight box or container (Cell phone boxes or gift boxes with lids are the best!)
- Aluminum sheets, pie pans, or empty cans
- Small needle or push pin
- Scissors
- Black tape
- Matte black spray paint or paint
- Fine grit sandpaper
Here are the steps to build a pinhole camera:
- Prepare the container.
Paint the inside and outside with black matte spray paint to make the interior light-tight. - Prepare the container lid.
Cut a small square opening in the center of the container’s removable lid or on the side of your container. - Make the pinhole.
Pierce a small hole in a piece of black matte construction paper or aluminum for the “lens.” - Attach the pinhole.
From the inside of the container, line up and tape the pinhole to the small square opening just cut. - Create the shutter.
Place a small piece of black tape on the outside of the pinhole to act as the shutter.
Here are the steps to load and develop a print:
- Load the paper.
In the darkroom or under a darkroom light, load the photo paper into the pinhole camera and position it opposite the pinhole. - Seal the camera.
In the darkroom, seal the container and lid tightly with black tape to make it light-tight. - Capture an image.
Go outside in daylight and steadily point the pinhole camera towards your subject. Remove the tape from the pinhole to expose the photo paper to light. - Develop the paper.
In the darkroom, remove the photo paper and develop it in the developer solution. - Fix and rinse.
Follow the development process with a stop bath, fixing, and rinsing to make the image permanent. - Dry and examine.
Dry the image. The image will be a negative, but if you want to make a positive print, use an enlarger or contact printing to expose it to another piece of photo paper.
5. Keeps darkroom photography alive!
Developing pinhole photographs may be the only opportunity students have to experience using a darkroom. Many students’ limited darkroom knowledge comes from shows or movies. Use the darkroom for an enjoyable, immersive, and hands-on way to introduce students to the old-fashioned process of making photographs.
There is a lot to love about pinhole photography! Instead of snapping a photo with a click of a button, students can experience what it is like to take a photograph from start to finish. This lovely art form can overlap with math, science, and history to create the perfect cross-curricular lesson. Students will naturally be more engaged and motivated with their learning as they experiment, dabble in chemistry, and focus on making something with their hands. Make pinhole cameras your next unit to bring the magic and joy of this historical process to your students!
Here are two additional resources to build your photography confidence:
- Creative Approaches to Beginning Photography Pack in PRO Learning
- Studio: Photography Course
How will you incorporate pinhole photography into your classroom?
Share your favorite photography unit!
Magazine articles and podcasts are opinions of professional education contributors and do not necessarily represent the position of the Art of Education University (AOEU) or its academic offerings. Contributors use terms in the way they are most often talked about in the scope of their educational experiences.