Art Education and the Coronavirus (COVID-19)
Being asked to shift your teaching practice from the classroom setting to at-home or eLearning is a challenge in itself. Not only do we have to take the time to learn new technologies, but we also have to find ways to simplify the art process so our students can find success. One of the most challenging parts of this transition is that not all of our students have the same access to art materials at home. Some of our students might not have anything but paper and pencil. With this in mind, it’s essential to develop lessons and activities that allow students to use whatever materials they have readily available at home.
Typically speaking, drawing activities are going to be a great place to start, but if you know your students, they will probably get sick of drawing if that’s all they are doing. Just as our students need to be creative, we might need to be creative with our supplies. Here are six different ideas your students can make using art supplies found around their homes.
1. Marker Monoprints
Materials Needed:
- Washable markers
- Paper
- Non-porous surface (plastic bags, aluminum foil, cling wrap, transparency, etc.)
- Water
There are a variety of ways to create monoprints with washable markers. The video below will take you through three different ways your students might use this technique at home. The first process uses a sandwich bag as the non-porous surface. The second technique uses a plastic grocery bag, and the third shows how aluminum foil might work for the monoprint process.
The nice thing about the marker monoprint process is that the non-porous surface can be reused again just by rinsing the marker off. To try out this process, first, use washable markers to create a design on the non-porous surface. This is a nice time to review color mixing. If students want to avoid getting brown in the next step, they’ll need to know which colors to choose.
Once the surface is coated with markers, spritz it with water. If students don’t have a spray bottle of water at home, have them lightly use their fingertips to drip water on top of the marker. From here, the markers will instantly transform into watercolors and start mixing. Place a piece of paper onto the wet transparency to create a print.
To take it up a notch, have your students create a drawing with permanent marker on their printing paper first. Here, the permanent marker design will remain intact as the printed image gets layered on top.
2. Mud Painting
Materials Needed:
- Dirt
- Water
- Paintbrush
- Paper
With this process, things might get a little dirty, but as art teachers, we know that sometimes the messiest activities are the most fun. Encourage your students to make their own paint by heading outside to create with mud.
To make mud paint, all you need to do is mix dirt and water. Just like watercolor, the more water added to the dirt, the lighter the mud will be. Different types of dirt and soil will also create different hues of brown. Send your students on a hunt to find different colors of soil so not only will they be making paint from nature; they’ll be exploring the world of science as a pedologist, a person who studies soil, for the day.
Similar to watercolor, the mud layers can be built on top of each other as they dry to create a more saturated painting. The above video shows some finishing detail with washable markers. You might encourage your students to add a little pop of color with some of the drawing materials they have at home.
3. Make Your Own Brushes
Okay, so we’re providing all of these ideas to create homemade paint, but what do we do if our students don’t have paintbrushes at home? Simple, let’s make them! Art teaches problem-solving and critical thinking skills, and challenging your students to create their own paintbrushes is a perfect example of this.
The above video shows different household and homemade items that can be turned into paintbrushes. Cotton swabs or an old toothbrush are found objects that might be readily available for at-home student use. Another key place for students to find inspiration is in nature. As outdoor spring cleaning occurs, this might be the perfect time to collect dried plants and grasses to create brushes. The natural brushes shown in the above video are made from pine needles, dried ornamental grasses, and dried iris plants. The organic materials are held together with a small piece of masking tape.
Will these alternative paintbrush ideas work as well as a regular brush? No, they probably won’t, but they are a great option when we don’t have any other choice.
4. Coffee and Tea Painting
Materials Needed:
- Coffee grounds or tea leaves
- Water
- Paper
- Paintbrush
Coffee grounds and tea leaves are other no-waste options for paint that will work similarly to watercolor while smelling a great deal better! Using the leftover coffee grounds or tea leaves from the bag soaked in water will create a paint-like substance. Different coffee roasts and flavors of tea will result in different colors. Once again, a rich layering effect can be achieved with this alternative paint medium.
5. Make Homemade Chalk Paint
Materials Needed:
- Flour or cornstarch
- Water
- Food coloring
As it gets nicer outside, no one wants to be stuck in front of a computer screen, so why not encourage your students to create outdoors?! Many of your students might have regular chalk sticks at home, but maybe they can make their own chalk paint to create some painterly effects on the concrete around their home or neighborhood.
The above video shows chalk paint made with two parts flour, one part water, and food coloring. The ratio of water to flour doesn’t really matter; however, the more fluid the mixture, the easier it is to paint with. The amount of food coloring added to the mixture depends on how bright you want your colors to dry. Here is an alternative recipe that uses cornstarch instead of flour. When dry, the chalk paint mixture will be more pastel and light in color, and it does not stain the concrete. Over time with rain and sun, the homemade chalk paint will wear away.
Learn more here!
6. Spice and Kitchen Item Paintings
Materials Needed:
- Spices and unused kitchen items
- Paper
- Water
- Paintbrush
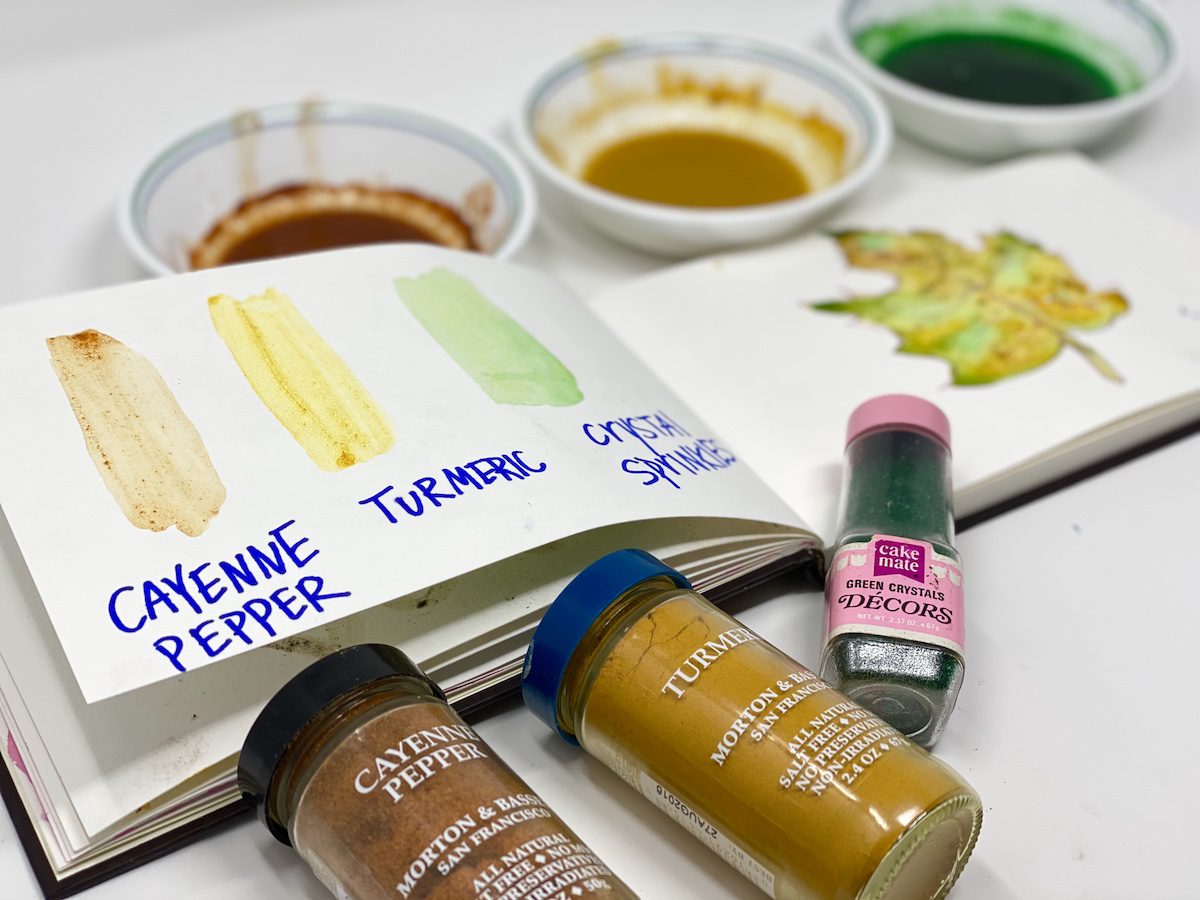
As we know, many of our students have challenging home lives. We don’t want them to be wasting food for the sake of art materials. However, in almost any pantry, there are probably some expired packages or spices used for that one recipe that one time. Whether it be cinnamon, Kool-Aid, or Jell-O, the kitchen might have some hidden art materials.
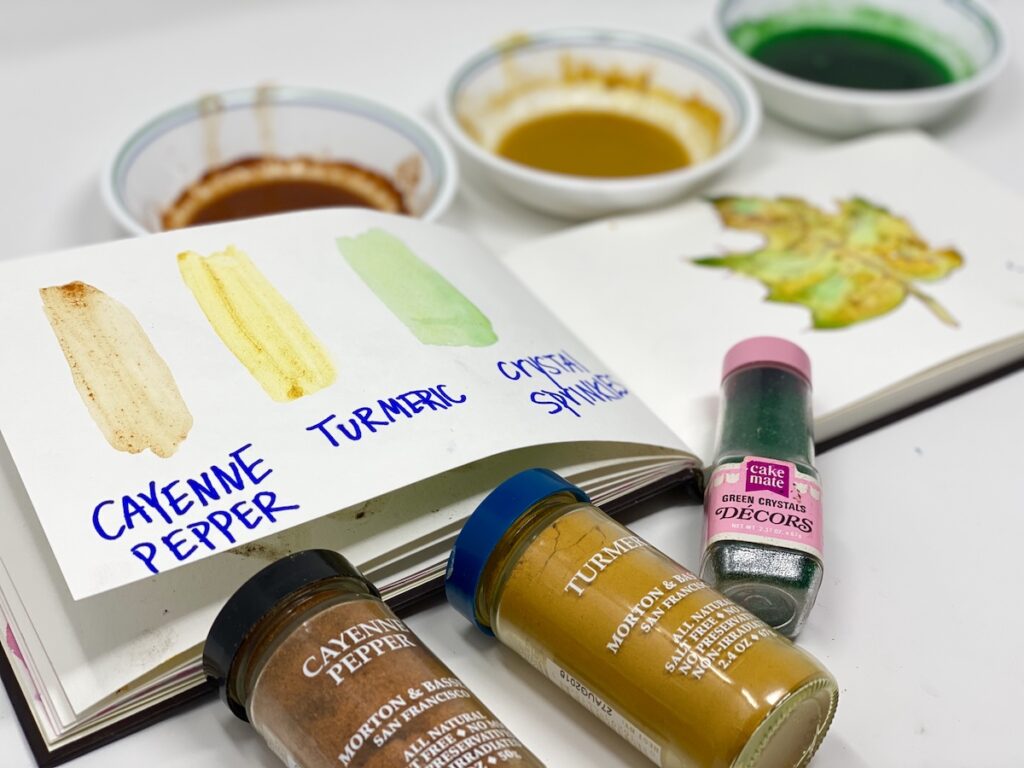
The above video shows the use of turmeric, cayenne pepper, and crystal sprinkles soaked in water to turn into a watercolor-like substance. The different homemade variations of paint can be used separately and even mixed together to create new colors.
Teaching art outside of our classroom setting isn’t going to be the same. But, we must find ways to make the most of the situation. One of the best things about teaching art to our students is the discovery in the process. Although some of the above supply ideas might not qualify as sophisticated art materials, they will be something new and exciting students can explore.
What’s your favorite homemade art material?
How are you dealing with your students who have limited access to art materials at home?
Magazine articles and podcasts are opinions of professional education contributors and do not necessarily represent the position of the Art of Education University (AOEU) or its academic offerings. Contributors use terms in the way they are most often talked about in the scope of their educational experiences.
