Project-Based Learning (PBL) is all the rage these days and for good reason! It’s exactly what the name implies: instead of lessons, students learn through projects. While using projects isn’t a revolutionary thought for the art room, there’s more to it for a project to truly fall under the guidelines of PBL. Let’s go through the benefits of focusing on projects and the steps to design an effective project.
Here are three benefits of Project-Based Learning:
- It makes real-world connections.
If you’ve ever heard students say they won’t use art in the real world, it’s time to focus on art beyond the classroom. In PBL, students act like artists by completing large-scale projects, usually beyond the walls of the art room. - It fosters collaboration.
PBL is almost exclusively done in groups. Students or the teacher choose the group. The structure and requirements for working in groups allow students to cater to group members’ strengths, hold each other accountable, and experience success as a team. - It serves the community.
Many PBL projects are for the school environment or the larger community. Students see their art as having a positive impact on others.
Let’s take a look at five steps to create a successful PBL project.
1. Create an entry document or entry event.
Every PBL project begins with an entry document or event. An entry document tells students what the project is about and it reads like a letter. The entry event is a more creative and engaging way to announce a project and should prompt student-generated wonder and questions. It can involve a field trip, guest speaker, video, simulation, or real or mock correspondence.
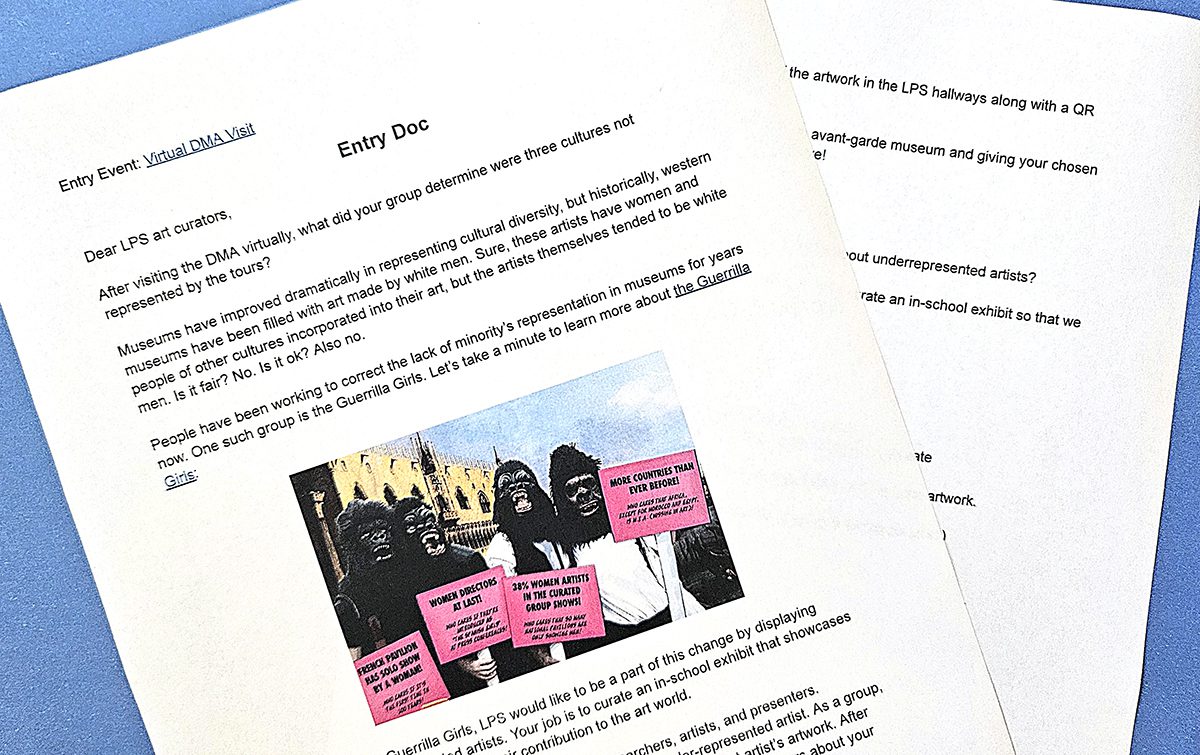
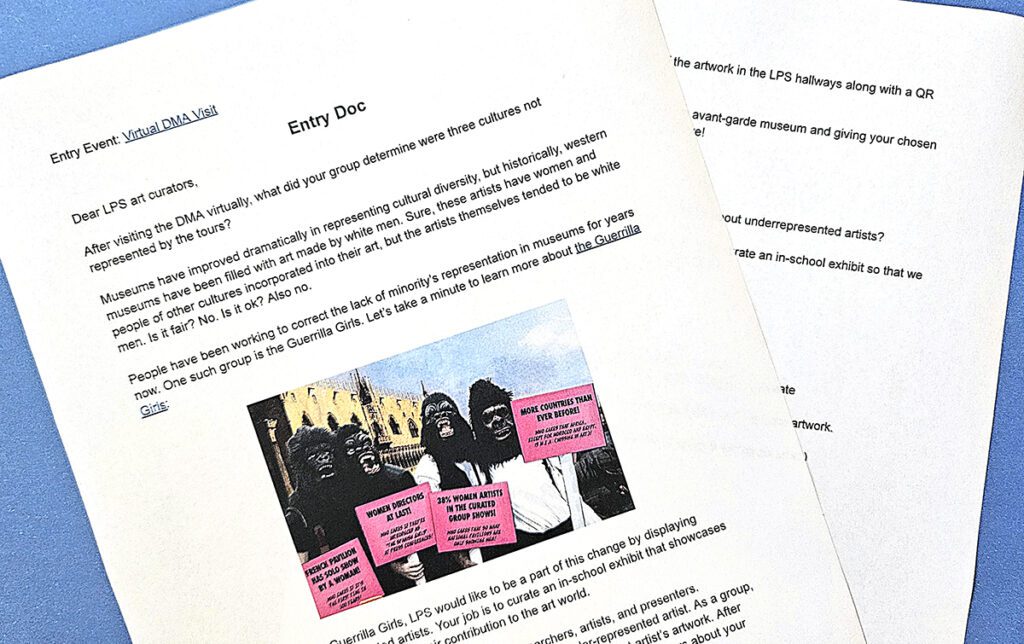
For example, say you want to have students create an exhibit featuring underrepresented artists. The entry event can be a visit to a local museum with an analysis of the artists’ demographics. The entry document can be a letter from the museum curator outlining the situation.
These three tips will help you create an effective entry document:
- Address the students as if they are professionals.
If students are creating a school-wide museum, the entry document would lead with, “Dear Curators.” If they’re painting a mural, it would be, “Dear Muralists.” - Limit the amount of information.
Only give the essential pieces of information in the entry document. If students know they can look at the entry document later, they are more likely to tune out. When students have to ask questions in order to be able to fully understand and complete the project, it increases engagement and knowledge retention. It also allows room for students to use their imagination to connect the dots. - Read the entry document aloud.
Print or provide digital copies of the entry document for your students to follow along with as you read it aloud. This way, they get both visual and auditory input and can more fully absorb the information.
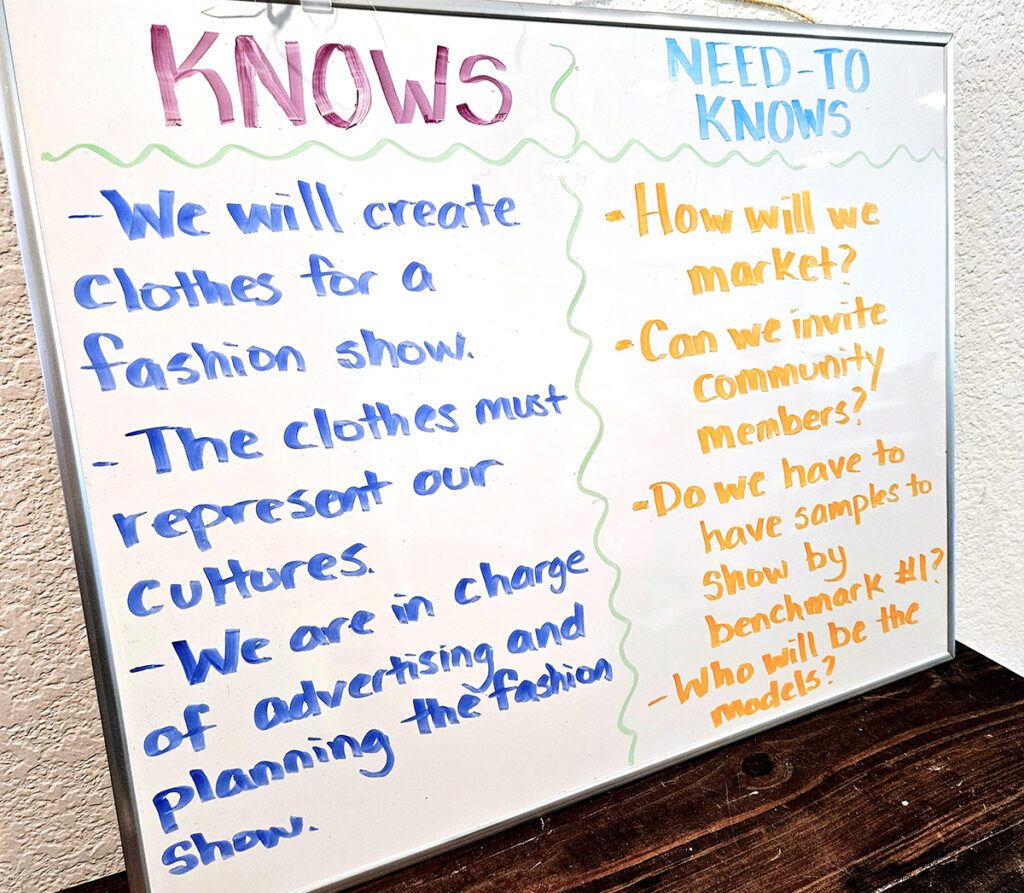
2. Compile “knows” and “need-to-knows.”
After reading the entry document, ask students what their “knows” and “need-to-knows” are. Knows are the information students have access to as part of the entry document. Need-to-knows are what students figure out on their own to complete their project. As students provide their knows and need-to-knows, be patient and allow them to make discoveries on their own. Write students’ knows and need-to-knows on a chart or digital document, print it, and post it so everyone can refer back to them.
3. Construct a group contract.
PBL projects are generally done within groups. The teacher or students can determine the groups. PBL provides students with real-world applications and teaches them how to do it well. To help students work well together as a team toward a common goal, students need to know group roles and expectations. This is where the group contract comes into play. Let’s take a look at the components of a group contract.
The group contract consists of at least four parts:
- Group Member Roles
- Group Expectations
- Fireable Offenses
- Student Signatures
1. Group Member Roles
Students need to know what their roles are. Like real-world teams, students have defined roles during the project. Student roles will be different based on the project. For example, if students are curating an exhibit, the group roles could be Researcher, Curator, Marketer, Museum Educator, and Museum Security. Students define the roles and expectations on their own through research. If one role requires less work than the others, that student will have the additional role of Helper. The Helper assists the whole team in fulfilling their roles. Also, ensure any Assistant role is clearly defined to prevent disengagement.
2. Group Expectations
Students determine what they expect from their group as far as behavior, participation, and attendance. Establish clear expectations at the beginning to set up the entire group for success. Expectations can cover how to handle member absences, what it looks like to contribute equally, examples of healthy communication, and a list of unacceptable behaviors. Acting out of accordance with the group expectations can result in the “firing” of the group member.
3. Firable Offenses
Firing a group member is a crucial element of PBL projects. This is not something students or teachers should do without careful consideration. The ability to fire group members protects students from an unfair workload or everyone’s grade suffering because of one student. It also shows them that real-world professionals who don’t do their jobs get fired.
Here is an example of a firing process:
- Give a formal warning.
In writing, the group assigns a formal warning to the group member for not following group expectations or not fulfilling their role. - Inform the teacher.
After each formal warning, the group informs the teacher. - Create an improvement plan.
The student and teacher discuss an improvement plan. The student presents the improvement plan to the group so they all know the expectations moving forward. - Give a second formal warning and reevaluate the improvement plan.
If the student does not abide by the improvement plan, the group issues a second warning and repeats the process. - Fire the group member.
If the student does not follow the improvement plan after the second warning, the group can fire them with the teacher’s permission. The fired student may complete the project by themselves.
4. Student Signatures
Once the group meets, discusses the contract, and refines roles and expectations, everyone signs the contract. This is a ritual that makes the contract “official” and “real” for students.
Download this complimentary editable PBL Group Contract. It includes Group Member Snapshots, Group Roles, Group Expectations, Conflict Resolution, and Warnings & Firings.

4. Set up benchmarks.
Although PBL requires students to act like professionals, they still need check-ins and support. Build in benchmarks for students to present their in-progress work. This includes showing evidence of working towards a finished product within guidelines. Generally, teachers conduct these benchmark checks. However, if the project is for a real-world client, teachers can ask the client to give in-progress feedback too.
5. Present completed projects.
Once students complete their project, they present it to their client. This will look different depending on the project. For a school-wide museum project, the clients would be visitors to the school museum. For a website redesign, students can present it to the company owner or potential users. No matter the audience, the presentation should represent professionalism in the end product, delivery, and appearance.
Implementing Project-Based Learning is attainable through these five steps. It will give students realistic, real-world experiences. It will also teach them collaboration with each other and the community. To create your own PBL project, start by composing an entry document and event. Then, give your students time and space to discover knows and need-to-knows. Divide students into groups and have them formulate and sign a group contract, like the editable one provided above. After students have worked through all the benchmarks, they present their projects to their clients. Students will finally see how their art education applies to the real world!
What is your favorite PBL lesson or entry event?
Share one benefit you’ve experienced from bringing PBL into your art room.
Magazine articles and podcasts are opinions of professional education contributors and do not necessarily represent the position of the Art of Education University (AOEU) or its academic offerings. Contributors use terms in the way they are most often talked about in the scope of their educational experiences.