Charcoal has an X factor. There is just something about it. It is messy, unpredictable and many students love it because it is a tool they probably don’t have at home. Charcoal allows the artist to achieve dark values quickly and blend with ease. While it’s fun to work with, some students may struggle controlling charcoal, avoiding unwanted smudges, and the general mess it can leave behind. It is a good idea to begin a drawing curriculum with traditional pencil and graphite drawing pencils first. This will allow students to sketch and explore a range of value and mark making. Once they’ve mastered some of these skills in pencil, you can introduce charcoal as an additional media. Then, provide your class with a few engaging projects and demonstrations to help them navigate using charcoal so they may fall in love with the media and use it in future drawing projects!
Value
Charcoal is an excellent tool for demonstrating a full range of value. Students can achieve different values by changing the amount of pressure used when creating marks and shading in different areas. Have students begin by creating a value scale of at least five distinct values from white to black. This allows students a reference point when they are working on various projects. You may have had students do this previously in pencil. Be sure to point out that a full range of value translates to all other art media.
1. Reductive Drawings
Sometimes with charcoal, it’s best to begin by embracing the mess at full force. Have students completely darken in their entire sheet of paper with a stick of charcoal. Their hands will be covered. The desks will be covered. There may even be charcoal dust on your chairs and floors for a couple of days, but the learning experience is worth it!
Once the paper has been transformed from white to black, tell students you’re going to flip everything they know about drawing. Instead of using a drawing tool to create a dark line, students will use an eraser to create a light line. Students will be looking for areas of highlights to erase, rather than areas of shadows to shade in. This kind of reverse thinking is engaging to students because it is something they may not have tried before.
To increase engagement, ask students to bring in an object or photograph as a reference. Consider requiring students to bring in an original photograph, rather than searching for images online.
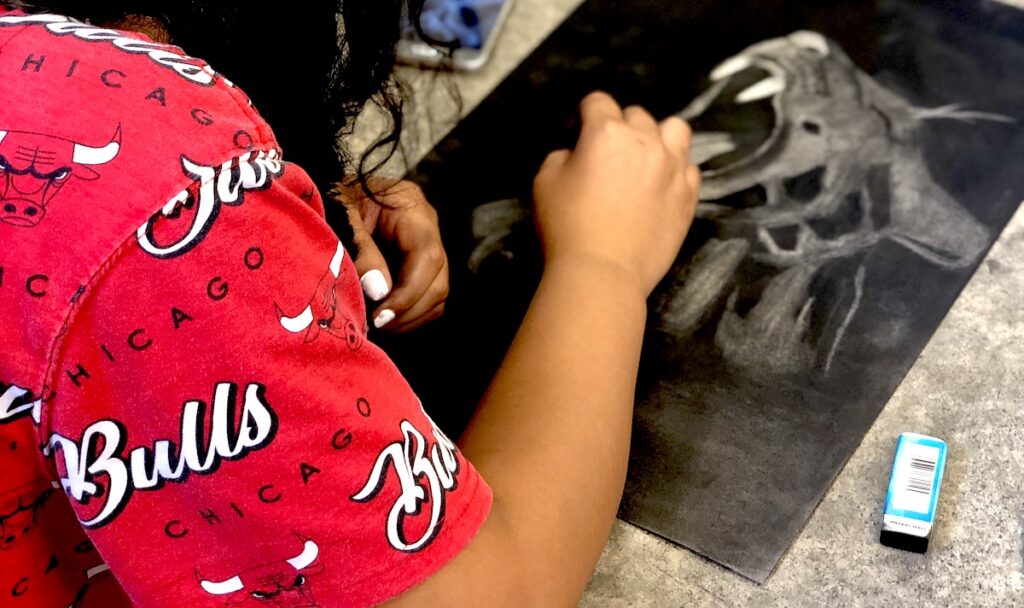
As students begin with their charcoal-filled paper, start with a simple pencil eraser for initial sketching. Circulate the room and check for correct proportions and strong composition. With these light eraser sketches, students can simply blend out any mistakes and revise easily. Once the drawing is solid, students can pay close attention to changes in value. Remind them to look for highlights to erase, areas to lighten, and shadows to leave dark.
Students will need large erasers to work on the reductive drawing. Any eraser will do, but the white pearl or hi-polymer erasers are great for projects like these. Kneaded erasers can be useful for picking up some of the charcoal but not completely erasing the surface, and allows students to get some of those mid-tones in their reductive drawings.
This project works because students love trying something new, and this is probably a new process and maybe a new material. It’s great for teachers because as students are having fun experimenting with charcoal and reductive drawing, they’re also applying their understanding of value scales and paying close attention to light and dark. This is a skill they can transfer to observational drawings and will serve them well as they move on in the school year to other media and color theory.
2. Charcoal Self-Portraits
Self-portraits are a staple of every art teacher’s curriculum but can be extremely intimidating to students of all ages. How can we make the project approachable to all and still build in essential skills?
One of the main deterrents for students is the fact that many are uncomfortable in their own skin. They may not want to create a drawing of themselves if they are self-conscious or shy. Students who have these feelings are already checked out the minute you say self-portrait. They will drag their feet, or produce something subpar just to get it over with.
Consider your audience, and think of a few ways to mix up the traditional self-portrait. Instead of taking polished smiling photos of students for reference, allow them to make funny or scary faces. Social media is filled with teachers who have introduced new ways of creating self-portraits from photographs. Have students squish their faces onto the photocopier. Allow students to use social media filters like those on Snapchat and Instagram to distort their selfies or add sunglasses, animal ears, beards, etc. to the image.
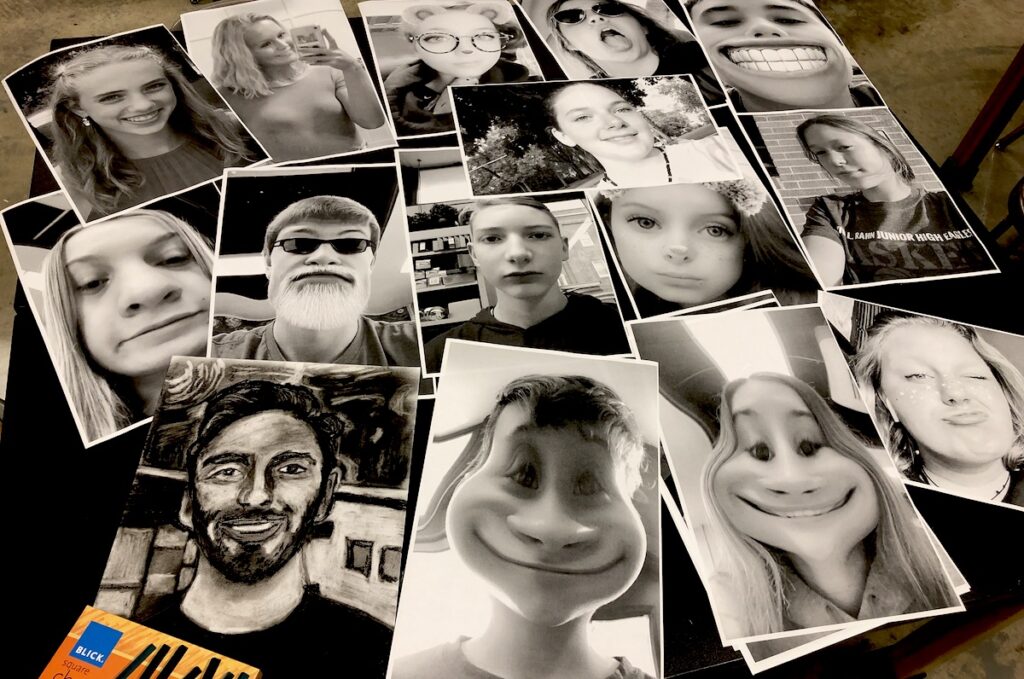
By allowing students to take a different approach to their self-portrait, and make light of it, you’re meeting them where they are. They’re kids or teenagers, and most would rather be silly than glamorous. However, if you have students who want to strike a pose, allow them that opportunity as well. Choices are important to the unique needs and personalities of your classroom. If students have the freedom to choose an image where they are most comfortable, they will work harder on the actual drawing.
Now that students have a chosen-image to reference, they can still be intimidated by recreating it in charcoal. Remember, your main goal for this particular project is to apply students’ understanding of value. Eliminate the intimidation and let students trace the contour lines from their photographs. If you have a light table or lightbox, this is the perfect project to use them. If not, classroom windows work great, or you could try a DIY lightbox by inserting Christmas lights into a clear storage box! Art teachers are resourceful, and there’s always a way to problem-solve.
Once students have traced their contour lines, they can begin applying value to their self-portraits. This will be a mix of adding value to create dark areas and erasing charcoal to re-establish highlights. The paper will get smudges, but charcoal is also pretty forgiving and can be erased, blended, and reapplied as needed. Encourage students to look closely at their reference image for lights and darks and all the values in between. Once they’ve completed their self-portrait, spray the finished work with spray fixative or hair spray to help seal the charcoal in place.
Students may gain confidence through this project and will have a better understanding of how to apply a full range of value to their projects. They will also enjoy seeing all of their classmates’ silly, distorted, glamorous, and/or weird faces in these unique self-portraits!
Looking for more charcoal techniques? Check out 2 Simple Tips to Take Your Charcoal Drawings to the Next Level, Drawing Using Charcoal PRO Pack and Drawing Using Charcoal PRO Pack. Both of these Packs can be found in PRO Learning.
Line Variety
Line variety is a skill students need more of. All too often, students rely on the same linework throughout a project and most of their work. You can probably think of your students who draw very light with fine, thin, and precise marks. How do we get students to incorporate more variety? Charcoal can be a great tool for encouraging looser markers and bolder lines.
3. Symmetrical Motion Drawings
Contemporary artist and dancer, Heather Hansen, is a great artist to introduce to your students. She applies movement to large-scale drawings in charcoal. There are several videos of her work on YouTube, and the unusual process will have your students in complete awe.
Hansen uses her whole body to create symmetrical marks on a canvas. Her arms move from the center outward in big, swooping circles, and repeated lines shooting outward. The more she repeats the motion, the darker and bolder the marks become. Areas become blended while some marks are made more intentional and left untouched.
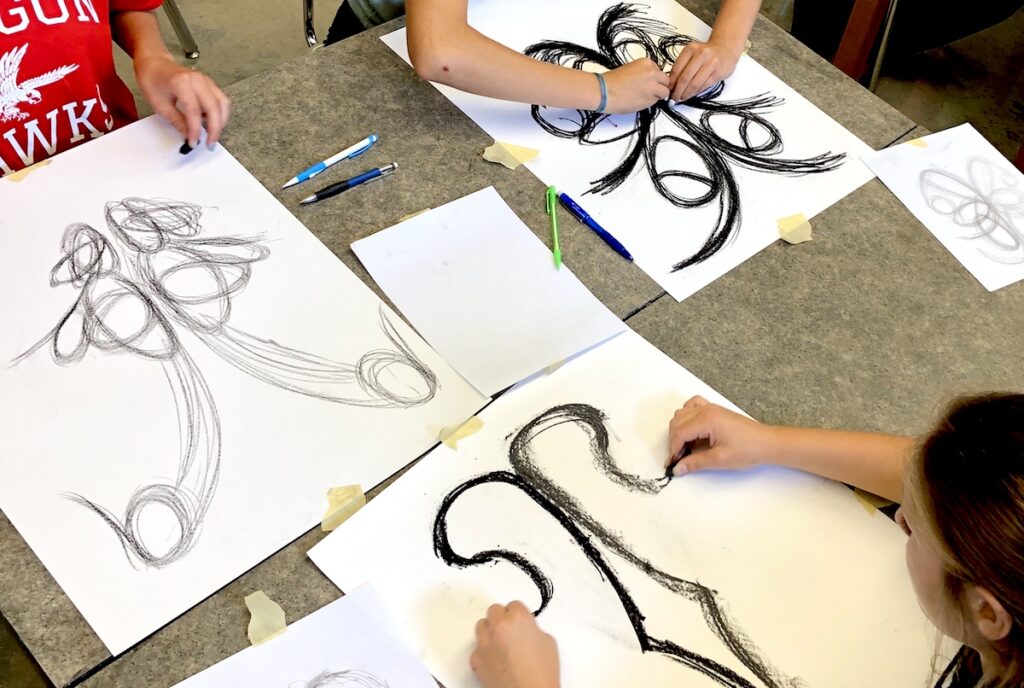
After showing your students some of her work in still image and video performance, you can unleash the class on symmetrical motion drawings of their own. Have them tape down the paper, or it will move as much as they do. Begin with a stick of charcoal in each hand, and move them in unison from the center outward. Most of your students will catch on to the process after watching the video, but you may have a few that have a hard time moving in unison. Others will be set on trying to create a recognizable symbol or figure in their drawing. Try to encourage them to let go of that notion and just focus on movement.
Once students have created works of their own, you can add a collaborative component by asking the class to partner up. Tape a large paper down as before, and instruct pairs of students to sit or stand on either side of the paper. Each student will have charcoal in each hand, and make symmetrical motions once again. However, this time, students will take turns following the lead of their partner. Students should try to mimic the motions their partner is making on the other side of the paper. This can result in some interesting abstract drawings. Chalk pastel is a nice alternative as well if you want to add some color to the project.
Final Thoughts
Charcoal is an amazing drawing tool your students will love experimenting with! Give them some direction with projects to increase their skills in value scale and line variety. These are fundamental skills they can build on throughout the year, and charcoal can be a great medium to introduce each concept. The bold lines and dark values will make an unforgettable impact hanging in the halls of your school!
What charcoal drawing projects are most successful in your classroom?
How do you introduce value scales to your students?
What are your go-to projects to encourage line variety?
Magazine articles and podcasts are opinions of professional education contributors and do not necessarily represent the position of the Art of Education University (AOEU) or its academic offerings. Contributors use terms in the way they are most often talked about in the scope of their educational experiences.