Art analysis is one of those skills that no one really prepares you to teach in art education programs. It’s probably one you can inherently do because the elements and principles are integral to how you think and process! But for our students, art analysis can be boring and confusing. Let’s encourage our students to put their thinking caps on and grab their magnifying glasses. Digging deeper into how and why artists made certain aesthetic choices is beneficial to your students’ learning and artmaking.
Here’s why art analysis is important:
- Examination
Analysis makes students really look at the details of an artwork they normally would glance at. - Appreciation
When students take the time to delve deeper, they increase investment and interest in what they’re learning. - Inspiration
Students discover new ways to use mediums, convey concepts, and portray subject matter. - Application
Analysis teaches and reviews the Elements of Art and Principles of Design. - Investigation
Students draw on prior knowledge, experiences, and other content areas to make connections, draw conclusions, and ask questions.
If you’re not sure where to start with bringing art analysis to your students, try these four simple and powerful exercises.
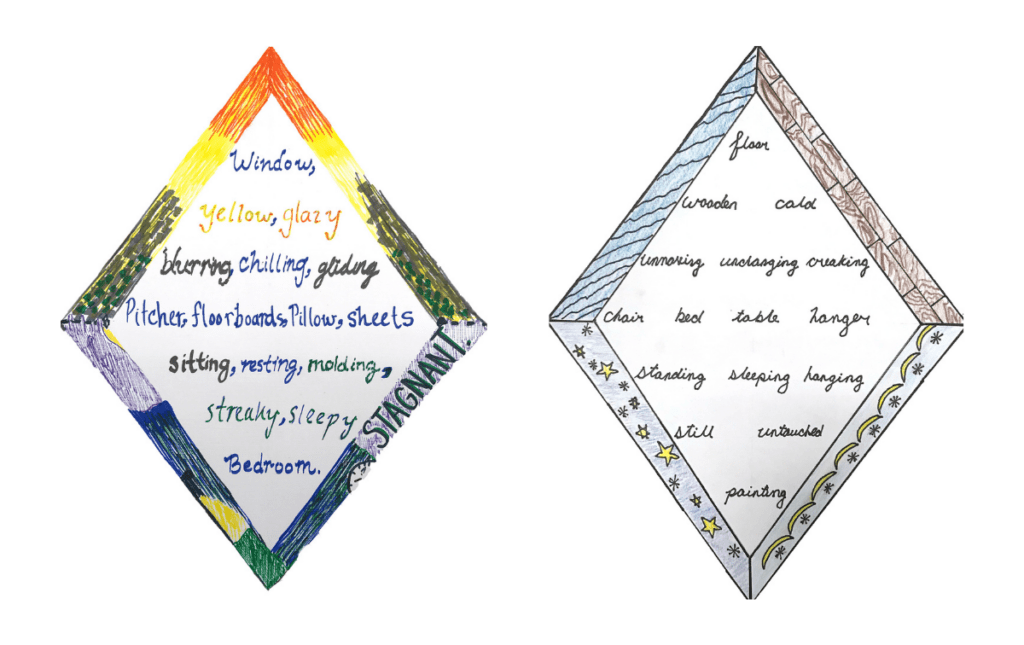
1. Brainstorm a gigantic collaborative list of descriptive words.
When you ask students, it seems like there are only three textures that exist: bumpy, rough, and smooth. Let’s get them to think beyond the default words and use more sophisticated language that more accurately reflects the artwork they are describing. Host a huge brainstorming session where students fill a giant sheet of bulletin board paper or a whiteboard with as many descriptive words as they can think of. Dust off those paper thesauruses (because we can all use a refresher on how alphabetical order works) and encourage students to look up synonyms. Make it a challenge where each table gets a different color marker to see which group can come up with the most words first!

Once the board is full, select a few similar words and discuss how they are different. For example, how is soft different than delicate? Shiny different from shimmering? Vibrant different from saturated? Do a poll with classroom objects to spark discussion!
If you’re looking for more ways for students to practice selecting and using descriptive language, introduce diamante poems. Don’t miss our free download and implementation tips!
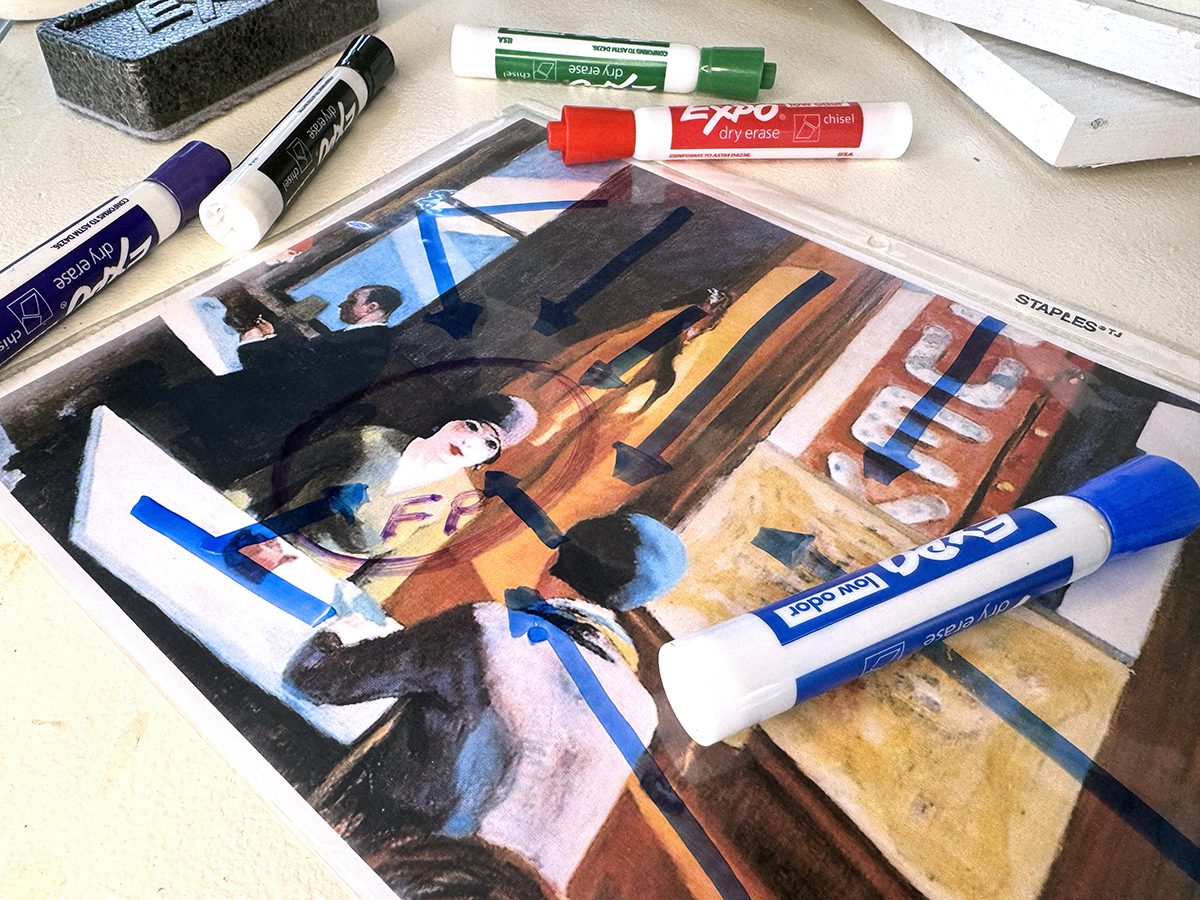
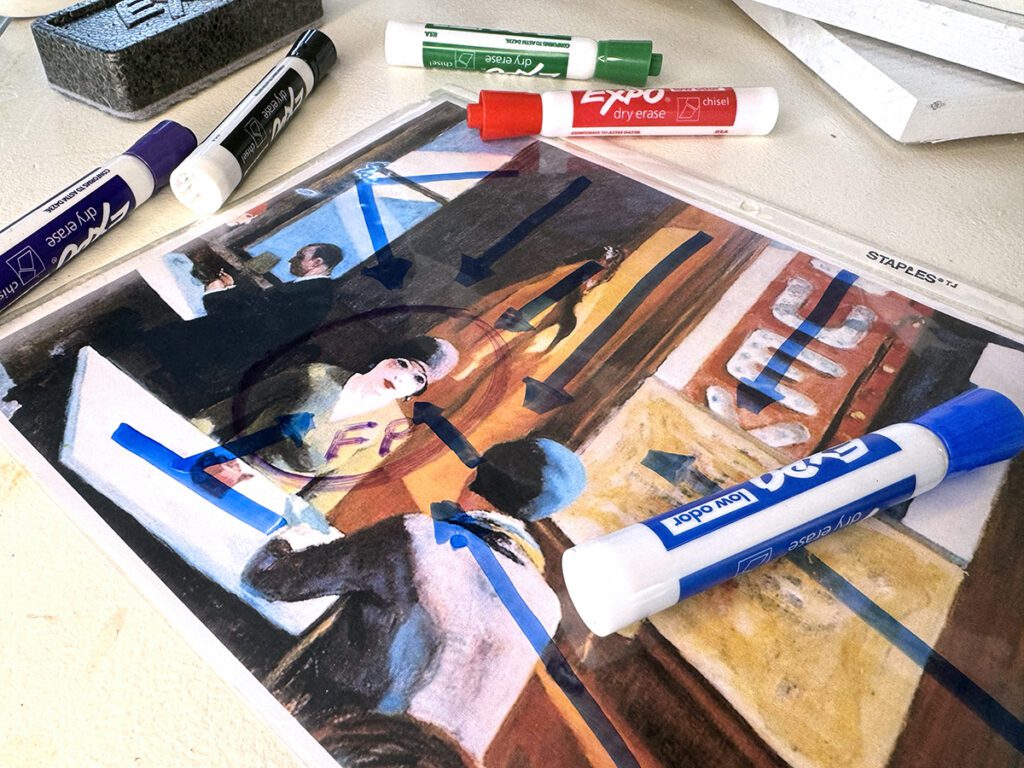
2. Annotate an artwork.
Many students are already familiar with annotating text because they do it in their core classes. Bring this skill into the art room and annotate artworks! Start with a simple representational painting or drawing. Bonus points if it’s something they may have seen before!
Here are my top five artworks for students to select from:
- The Bedroom by Vincent van Gogh
- Thunderstorm by Grandma Moses
- Nighthawks by Edward Hopper
- The Starry Night by Vincent van Gogh
- The Son Of Man by Rene Magritte
If you have time, allow students to replicate this in their sketchbook. It doesn’t have to be super detailed but should include large shapes and colors to provide enough compositional information. This is a great time to introduce very basic gridding principles by dividing the image and their paper into quadrants to assist with proportion and placement. Students enjoy this part because you are freeing them from capturing small details and they like to copy pictures.
If you’re short on time, no worries! Print enough copies for each student to draw directly on top of. Alternatively, print a class set and slide them into plastic sleeve protectors for students to annotate on with dry-erase markers.
The first time you do this activity, scaffold it and do it together as a class. Students identify the focal point and circle it. Students draw arrows to note paths of movement towards the focal point. Students label any elements or principles that are creating paths of movement. For example, a student annotating Starry Night may label the swirls in the sky as short, dashed lines.
3. Compare and contrast two similar artworks.
A classic coloring book activity was finding the differences between two simple line drawings. Students still love doing this with art! Select two artworks that are similar. Use contemporary artworks that draw inspiration from the past to create connections that transcend time periods.
Provide a Venn diagram (search for the Venn Diagram student-facing resource in FLEX Curriculum) or have students create their own graphic organizer in their sketchbooks. Students search for similarities and differences in each artwork however they have to correlate their finds to the Elements of Art and Principles of Design. In the stained glass examples below, a similarity is the swirling, ornate gold lines that create a pattern across the top of each panel.

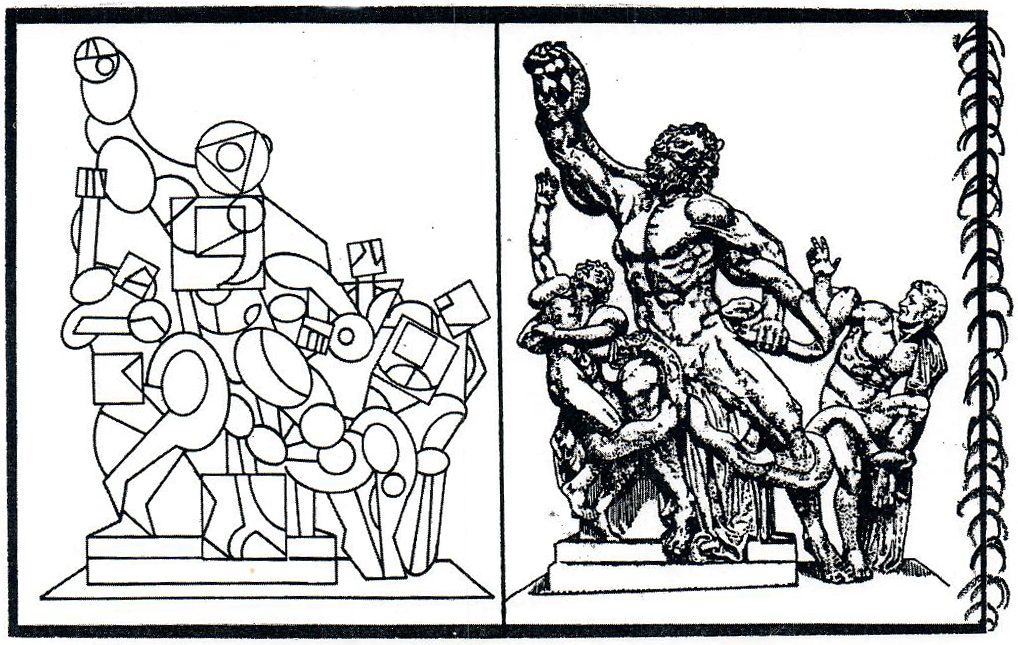
4. Break down a sculpture into shapes.
Scrutinizing sculpture for the elements and principles really hones analysis skills, just like making three-dimensional art builds stronger drawers. However, sculpture can be tricky for students to analyze because they need to consider all angles instead of just one. Once students get two-dimensional analysis down, introduce three-dimensional pieces with this exercise to help students see basic shapes and forms.
Start with a picture of a sculpture. Each student can get their own photo to draw directly on or use a dry-erase marker with a photo inserted into a plastic sleeve protector. Trace all of the shapes in the sculpture. Count the amount of each shape. Which shape(s) are most prominent? Consider the descriptive language the shapes have in common. For example, are the shapes primarily curved and rounded or angular and straight?
Art analysis doesn’t have to be boring and teaching it doesn’t have to be daunting! Bring the benefits of art analysis to your students so they become more observant, stronger artists, and more effective communicators. Start with simple exercises to break the process down into tangible tasks where students can experience success. Brainstorm a giant list of descriptive words to provide a foundation for students to draw upon. Compare and contrast two similar artworks to merge the past and present. Draw directly onto an artwork to identify compositional elements or core shapes and forms. Whether you try one of these activities or all of them, your students will appreciate how analysis can be interactive and easy to understand!
What art analysis activities do you enjoy doing with your students?
Share what’s still challenging about teaching art analysis.
Magazine articles and podcasts are opinions of professional education contributors and do not necessarily represent the position of the Art of Education University (AOEU) or its academic offerings. Contributors use terms in the way they are most often talked about in the scope of their educational experiences.