Many art projects have multiple steps and take several days. So when you have a good one-day art lesson, it hits differently! When students can experience the entire creative process in a single class period, it is powerful and engaging. Single-day art projects offer artists this opportunity and come in handy for a variety of circumstances.
Every art teacher needs an impactful collection of one-day art lessons to whip out at a moment’s notice. Car troubles, illness, holiday celebrations, school events, and any number of situations regularly interfere with your teaching schedule. Perhaps you finished a longer unit and your students are frustrated and about to lose interest. If you need a sub plan in a hurry or simply want to shake things up to keep your art room interesting, try a one-day art lesson.
The best one-day art lessons are fun and simple. They also offer a high margin of success for teachers and students.
Keep your students highly engaged with projects that promote creative independence. Successful one-day art lessons have these aspects in common:
- Limited, clear steps
- Completion in one class period
- Student autonomy (choice in material, design, color, etc.)
- Scaffolding for future skills and techniques
- Easy clean-up
Add these six one-day elementary art lessons to your repertoire of quick and impactful artmaking experiences. These projects check all of the boxes and are sure to captivate your artists’ attention!
1. Folded Surprise Drawings
Make a simple drawing exercise 10 times more exciting by adding a surprise reveal! Set the stage and add an ELA tie-in to this lesson with an animal or creature read-aloud like Wild Beings or Where the Wild Things Are. Provide a list of surprises students can add to their drawings, like teeth, a little animal friend, or a hidden treasure. Include time at the end of class to share the drawings and see what other artists think of the surprise!
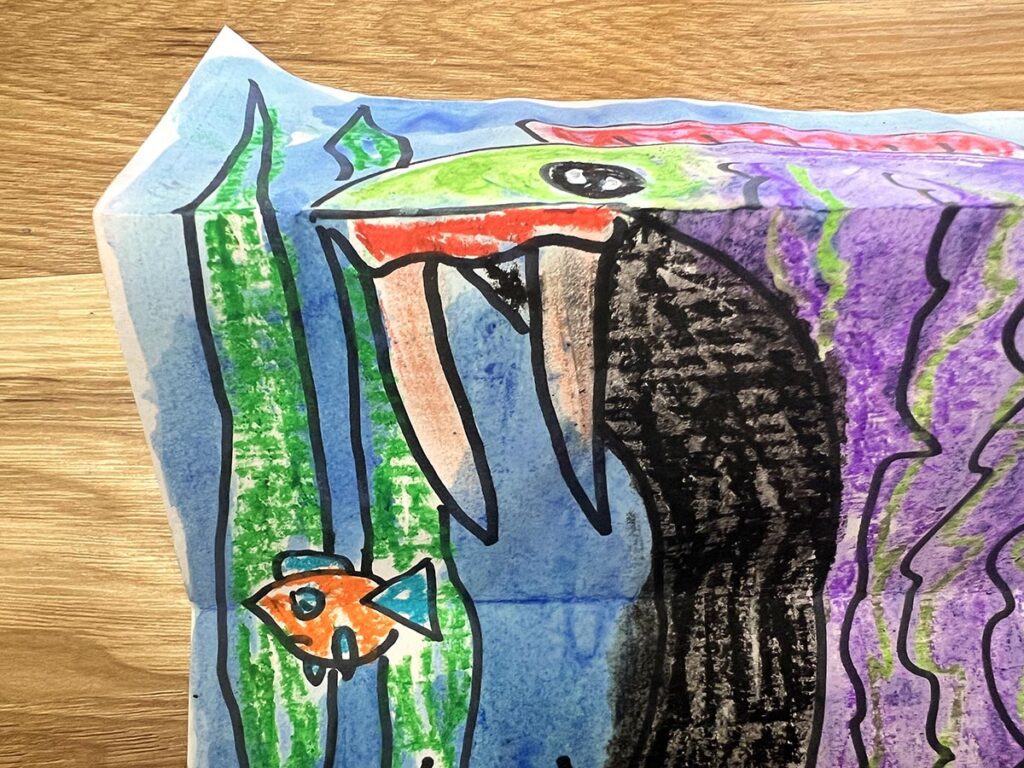
Here’s how to make innovative surprise drawings:
- Fold a piece of paper in half horizontally. Then, fold the top layer back to create a hidden fold.
- Keep the paper folded and draw an animal or creature on the page with a pencil. Trace with a permanent marker.
- Open up the fold and draw in a fun surprise, matching the inside lines and details to the drawing from the front.
- Fill the drawings with color.
Do you want to extend your lesson?
Explore other ways to make drawing more innovative for your students, do another literary-inspired project, or expand on folded art through bookmaking. For inspiration, turn to the Folded Books and Exploring Book Making Collections in FLEX Curriculum.
2. Styrofoam Marker Prints
Dive into the world of printmaking without the usual mess. It’s magical when students can generate multiple versions of their masterpieces. Focus on practicing printmaking vocabulary, studying the art of Herve Tullet, or illustrating an everyday moment in your students’ lives. Have your artists collect their ideas and plan using the Visual Imagery Practice Guide from FLEX Curriculum.
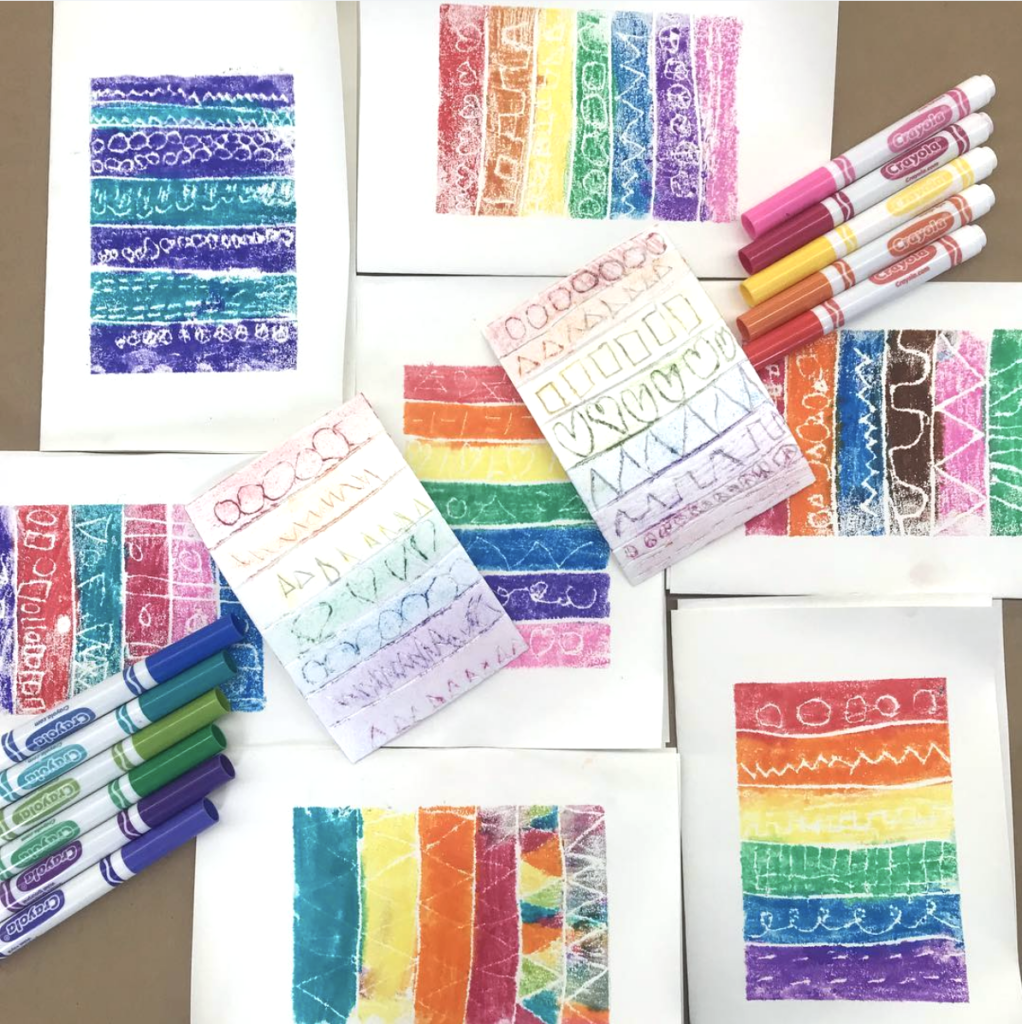
Create vivid marker prints by following these steps:
- Sketch an image onto a piece of styrofoam with a pencil and impress it with a pen.
- Color over the styrofoam with one or two colored markers.
- Lightly mist a sheet of paper with water from a spray bottle.
- Place the damp side of the paper on the colored styrofoam plate. Gently press, pull, sign, and date the print.
- To reprint, repeat the steps above. To change colors, clean the plate with a wipe, damp paper towel, or rag, then color with different markers.
Do you want to extend your lesson?
Use printing ink or paint to level up the styrofoam printmaking experience, or try a different printing technique, like tinfoil printmaking in the video below. The Elementary Printmaking with Simple Materials Pack from PRO Learning and Renae Greene’s DITL episode are both full of more lesson ideas your students will love!
3. Cotton Swab “Oil Paintings”
Oil painting may be for the masters, but who says young artists can’t give it a go? Try “painting” with oil pastels for a fun introduction to observational drawing and still lifes. Although you can use any complex item or arrangement of objects for this project, drawing mannequins makes the perfect subject for elementary artists. Bring in a small bottle of cooking oil, and you’re ready to make some masterpieces!
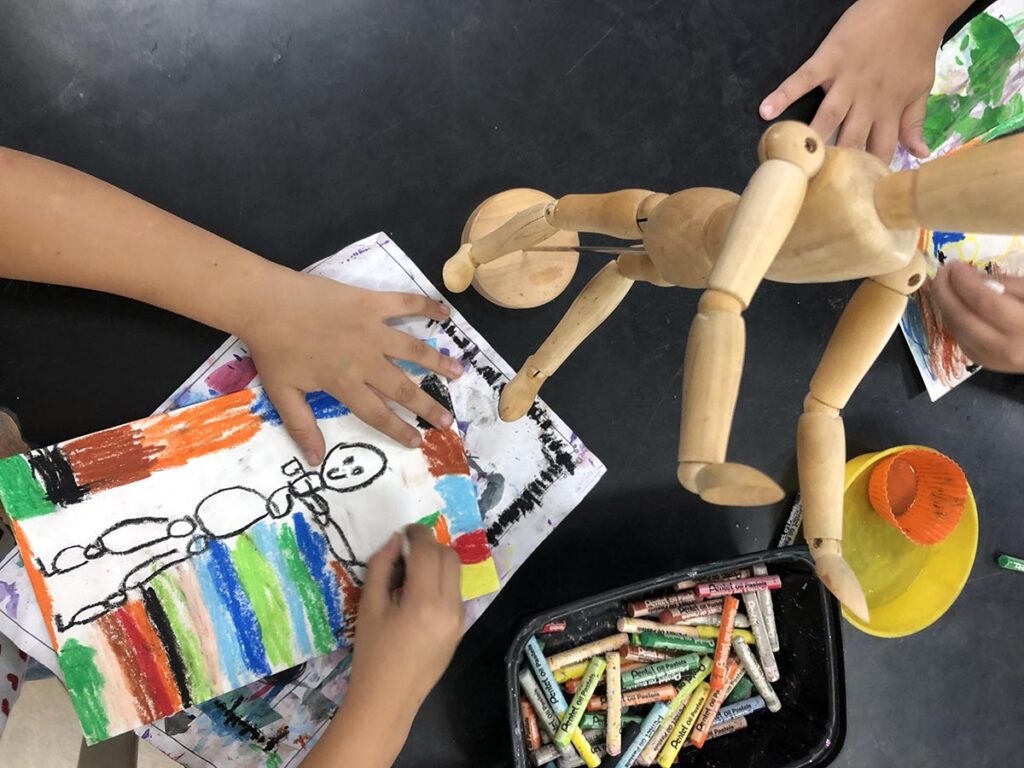
Set up the artmaking experience like this:
- Work in groups to pose the drawing mannequin in an interesting way.
- Use basic shapes to draw all of the parts of the mannequin.
- Loosely fill in the background behind the mannequin with a few oil pastel swatches.
- Use a cotton swab dipped in cooking oil to blend the oil pastel swatches to create a painted effect.
Do you want to extend this lesson?
Take this observational drawing exercise to the next level with a still-life drawing project. The Building Block Still Life Lesson from FLEX Curriculum is a great one to start with. Discover more still-life project ideas in the Introduction to Still Life Pack from PRO Learning.
4. Ice Pop Stick Loom Weavings
This mini-weaving project is just one way to bring techniques traditionally considered “craft” into your fine arts classroom. The hands-on and tactile nature of working with string, yarn, and ribbon makes fiber arts highly engaging for artists of any age. To make weaving more manageable for your youngest students, pre-assemble loom frames and substitute ice pop sticks glued vertically for warp threads.
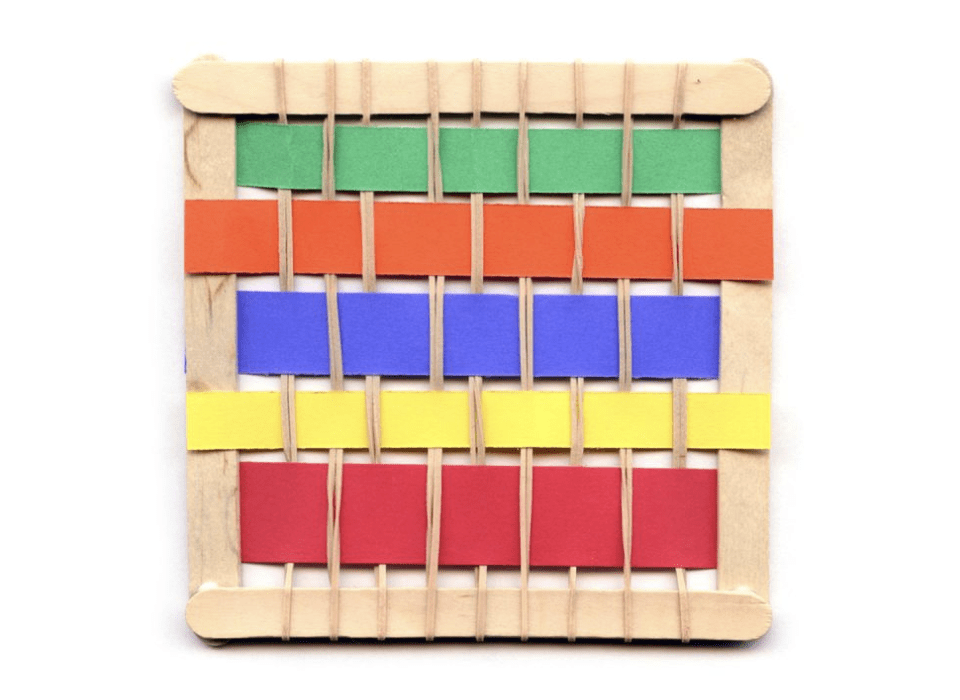
Weave mini masterpieces following these steps:
- Hot glue four ice pop sticks together in a square to create a loom frame.
- Stretch rubber bands across the frame horizontally to create warp threads.
- For the weft, use strips of paper, cloth, felt, and yarn to weave over and under each warp thread. Alternate with each line and secure the ends with liquid glue.
- Add a decorative hanger made out of twisted pipe cleaners, braided yarn, or ribbon.
Do you want to extend this lesson?
Watch Sarah Krajewski’s episode below for five more elementary fiber ideas, explore one of these unexpected fiber projects, or introduce your students to one of these fantastic fiber artists.
5. DIY Sticker Art
There’s no denying the appeal of colorful visuals you can stick anywhere! Harness this fascination and turn it into engagement in your art room with DIY stickers. Students can draw shapes, emojis, letters, animals, or anything else they like. Use permanent or paint markers to sketch doodles and designs on shipping labels or blank sticker paper. Alternately, use clear packing tape to transform paper drawings. Cut out the DIY stickers and use them in a future collage project.
Do you want to extend this lesson?
Dig into storytelling through art by creating collages that convey a meaningful memory. The Talking About Art Lesson in FLEX Curriculum offers detailed instructions and an added digital integration. For more project inspiration, dive into the worlds of mixed-media artists or the Collage for Early Elementary Pack in PRO Learning.
6. Push Pin Assemblages
Keep the mixed-media train going by exploring a 3D form of collage—assemblages. These simple artworks allow students the freedom to make creative design choices. It also serves as a great stepping stone to working with sculpture. And the best part? No glue is necessary! Pre-cut two 6×6 inch cardboard squares and a piece of aluminum foil for each student and release them to create.
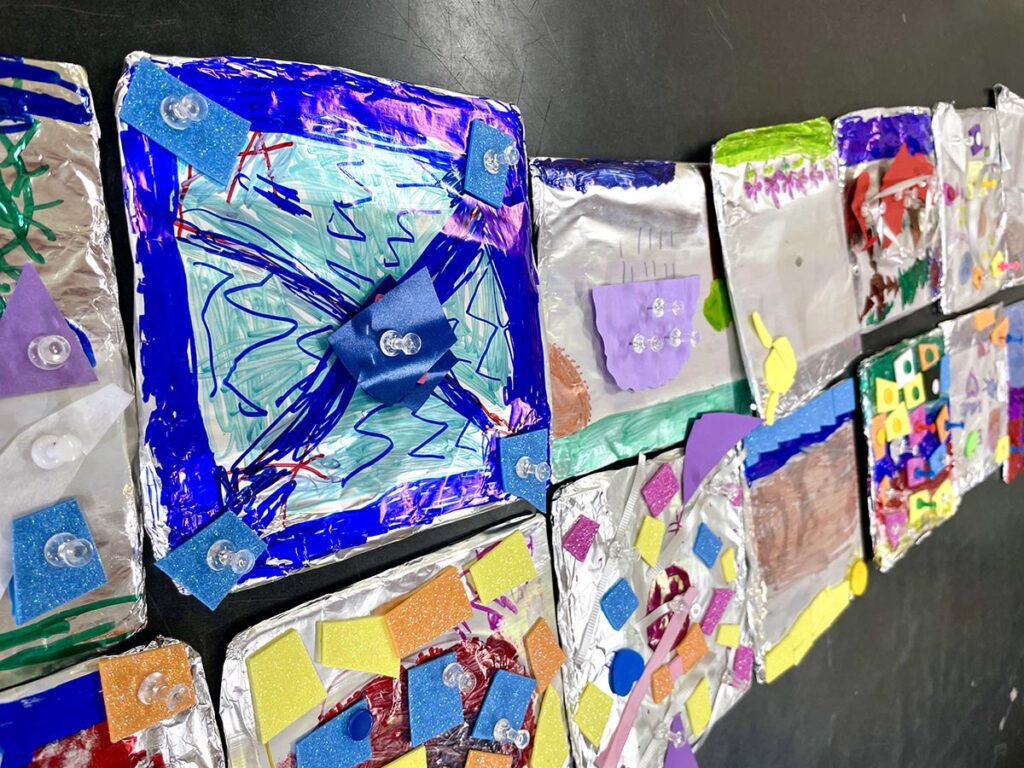
Students pin together an assemblage following these steps:
- Wrap two cardboard squares together in aluminum foil like a present and secure the foil with masking tape on the back.
- Fill as much of the aluminum foil-covered squares with colorful permanent marker drawings as possible in 5-7 minutes.
- Attach foam and paper shapes, ribbons, and other materials to the squares with push pins.
- Wrap yarn or ribbons between the push pins to add a final layer to the assemblage.
- Staple a yarn or ribbon hanger to the back.
Do you want to extend this lesson?
Overcome your sculpture nerves and build on the 3D nature of this project. This lesson is the perfect precursor to making process-based city sculptures or trying one of these inexpensive and storage-friendly sculpture ideas.
One-day art lessons are simple ways to spark your students’ interests and creativity in a short time frame. They are also handy to have in your back pocket for unexpected schedule changes or emergencies. Fold a surprise, “paint” with oil pastels, or make some DIY stickers with your artists to curate a novel, unconventional experience in your art room, sure to break up the monotony. Take what you discover along the way and use it as a springboard for future learning. Hook your students in no time—and it will be the best day ever!
Which one-day project will you try with your students first?
What other one-day art lessons do you have in your repertoire?
Magazine articles and podcasts are opinions of professional education contributors and do not necessarily represent the position of the Art of Education University (AOEU) or its academic offerings. Contributors use terms in the way they are most often talked about in the scope of their educational experiences.